Christmas Crush Day 20

Well TGIF I say.  It’s been a long week and I get a 3 day weekend.  I decided to take the day off tomorrow to observe Remembrance Day.  We have ceremonies in the morning so it I feel it will be nice to pay my respects to those who have protected me in my amazing country.  Of course we all will remember and reflect of the sacrifices that were made.  I say to anyone who is in service now and who has made sacrifices for me, Thank you.  I am humbled.

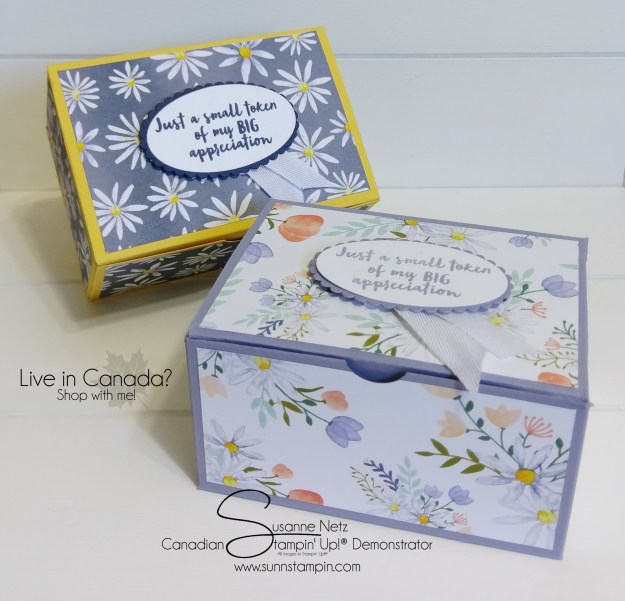
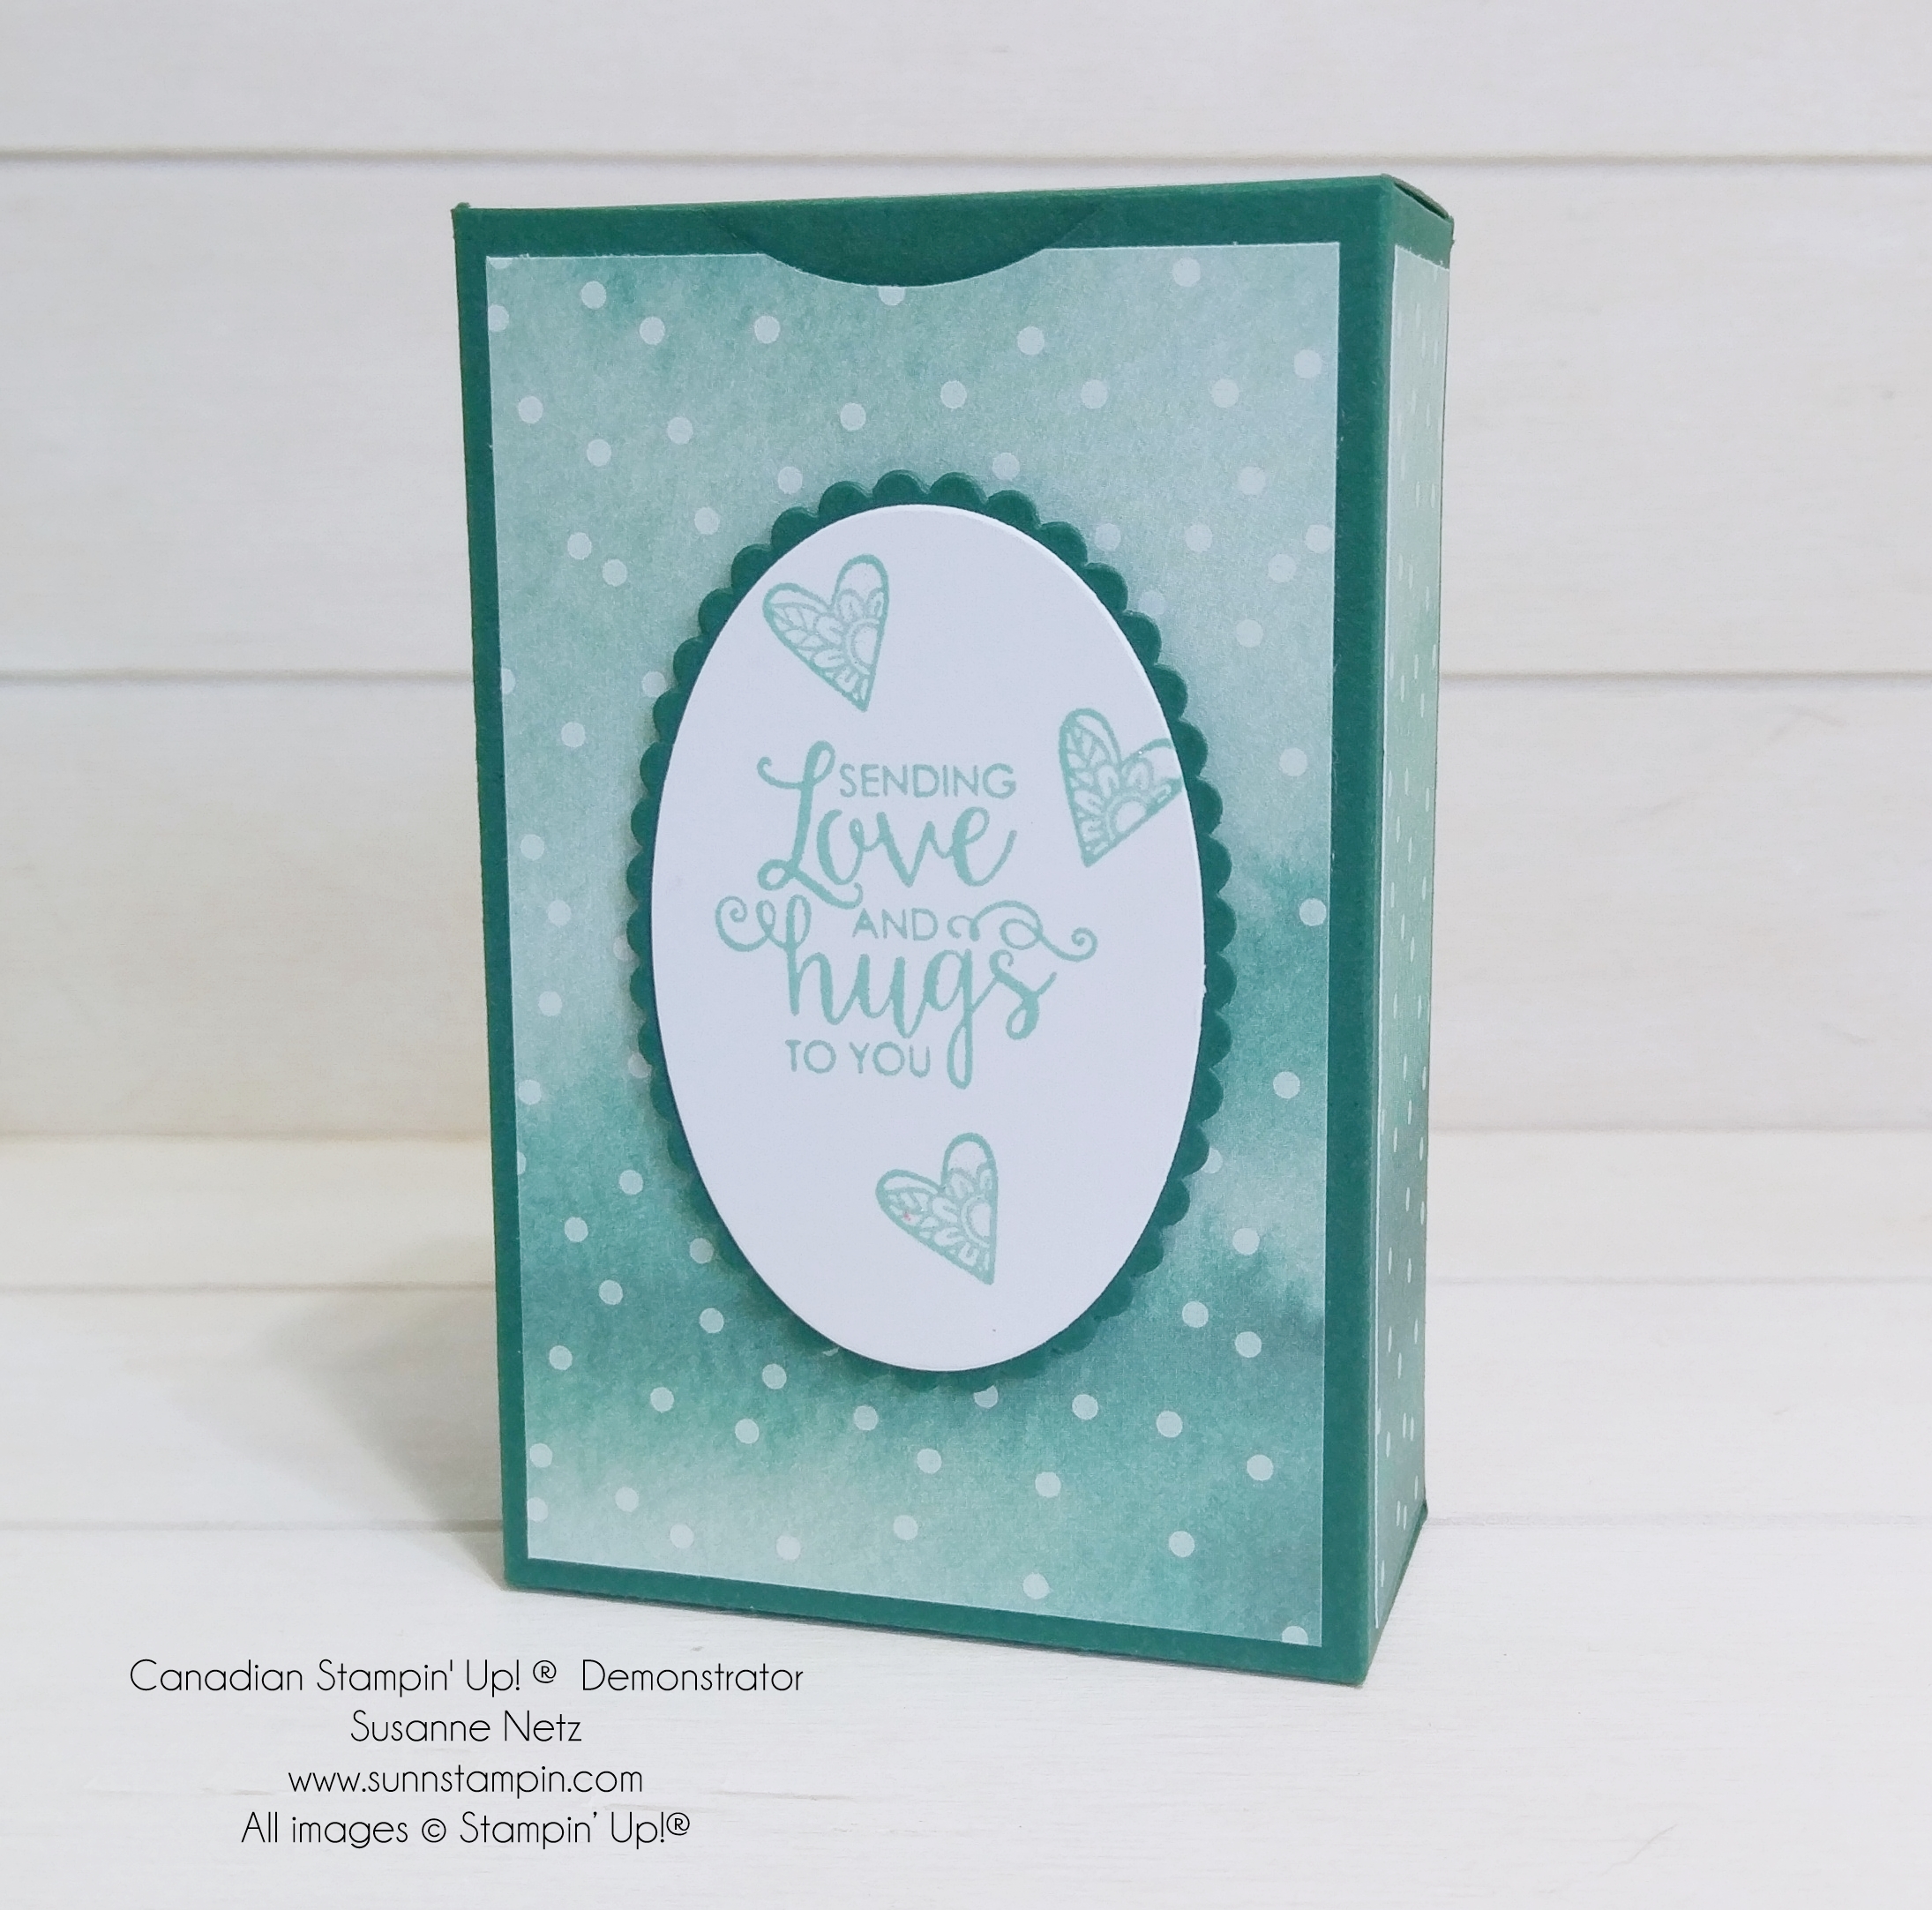
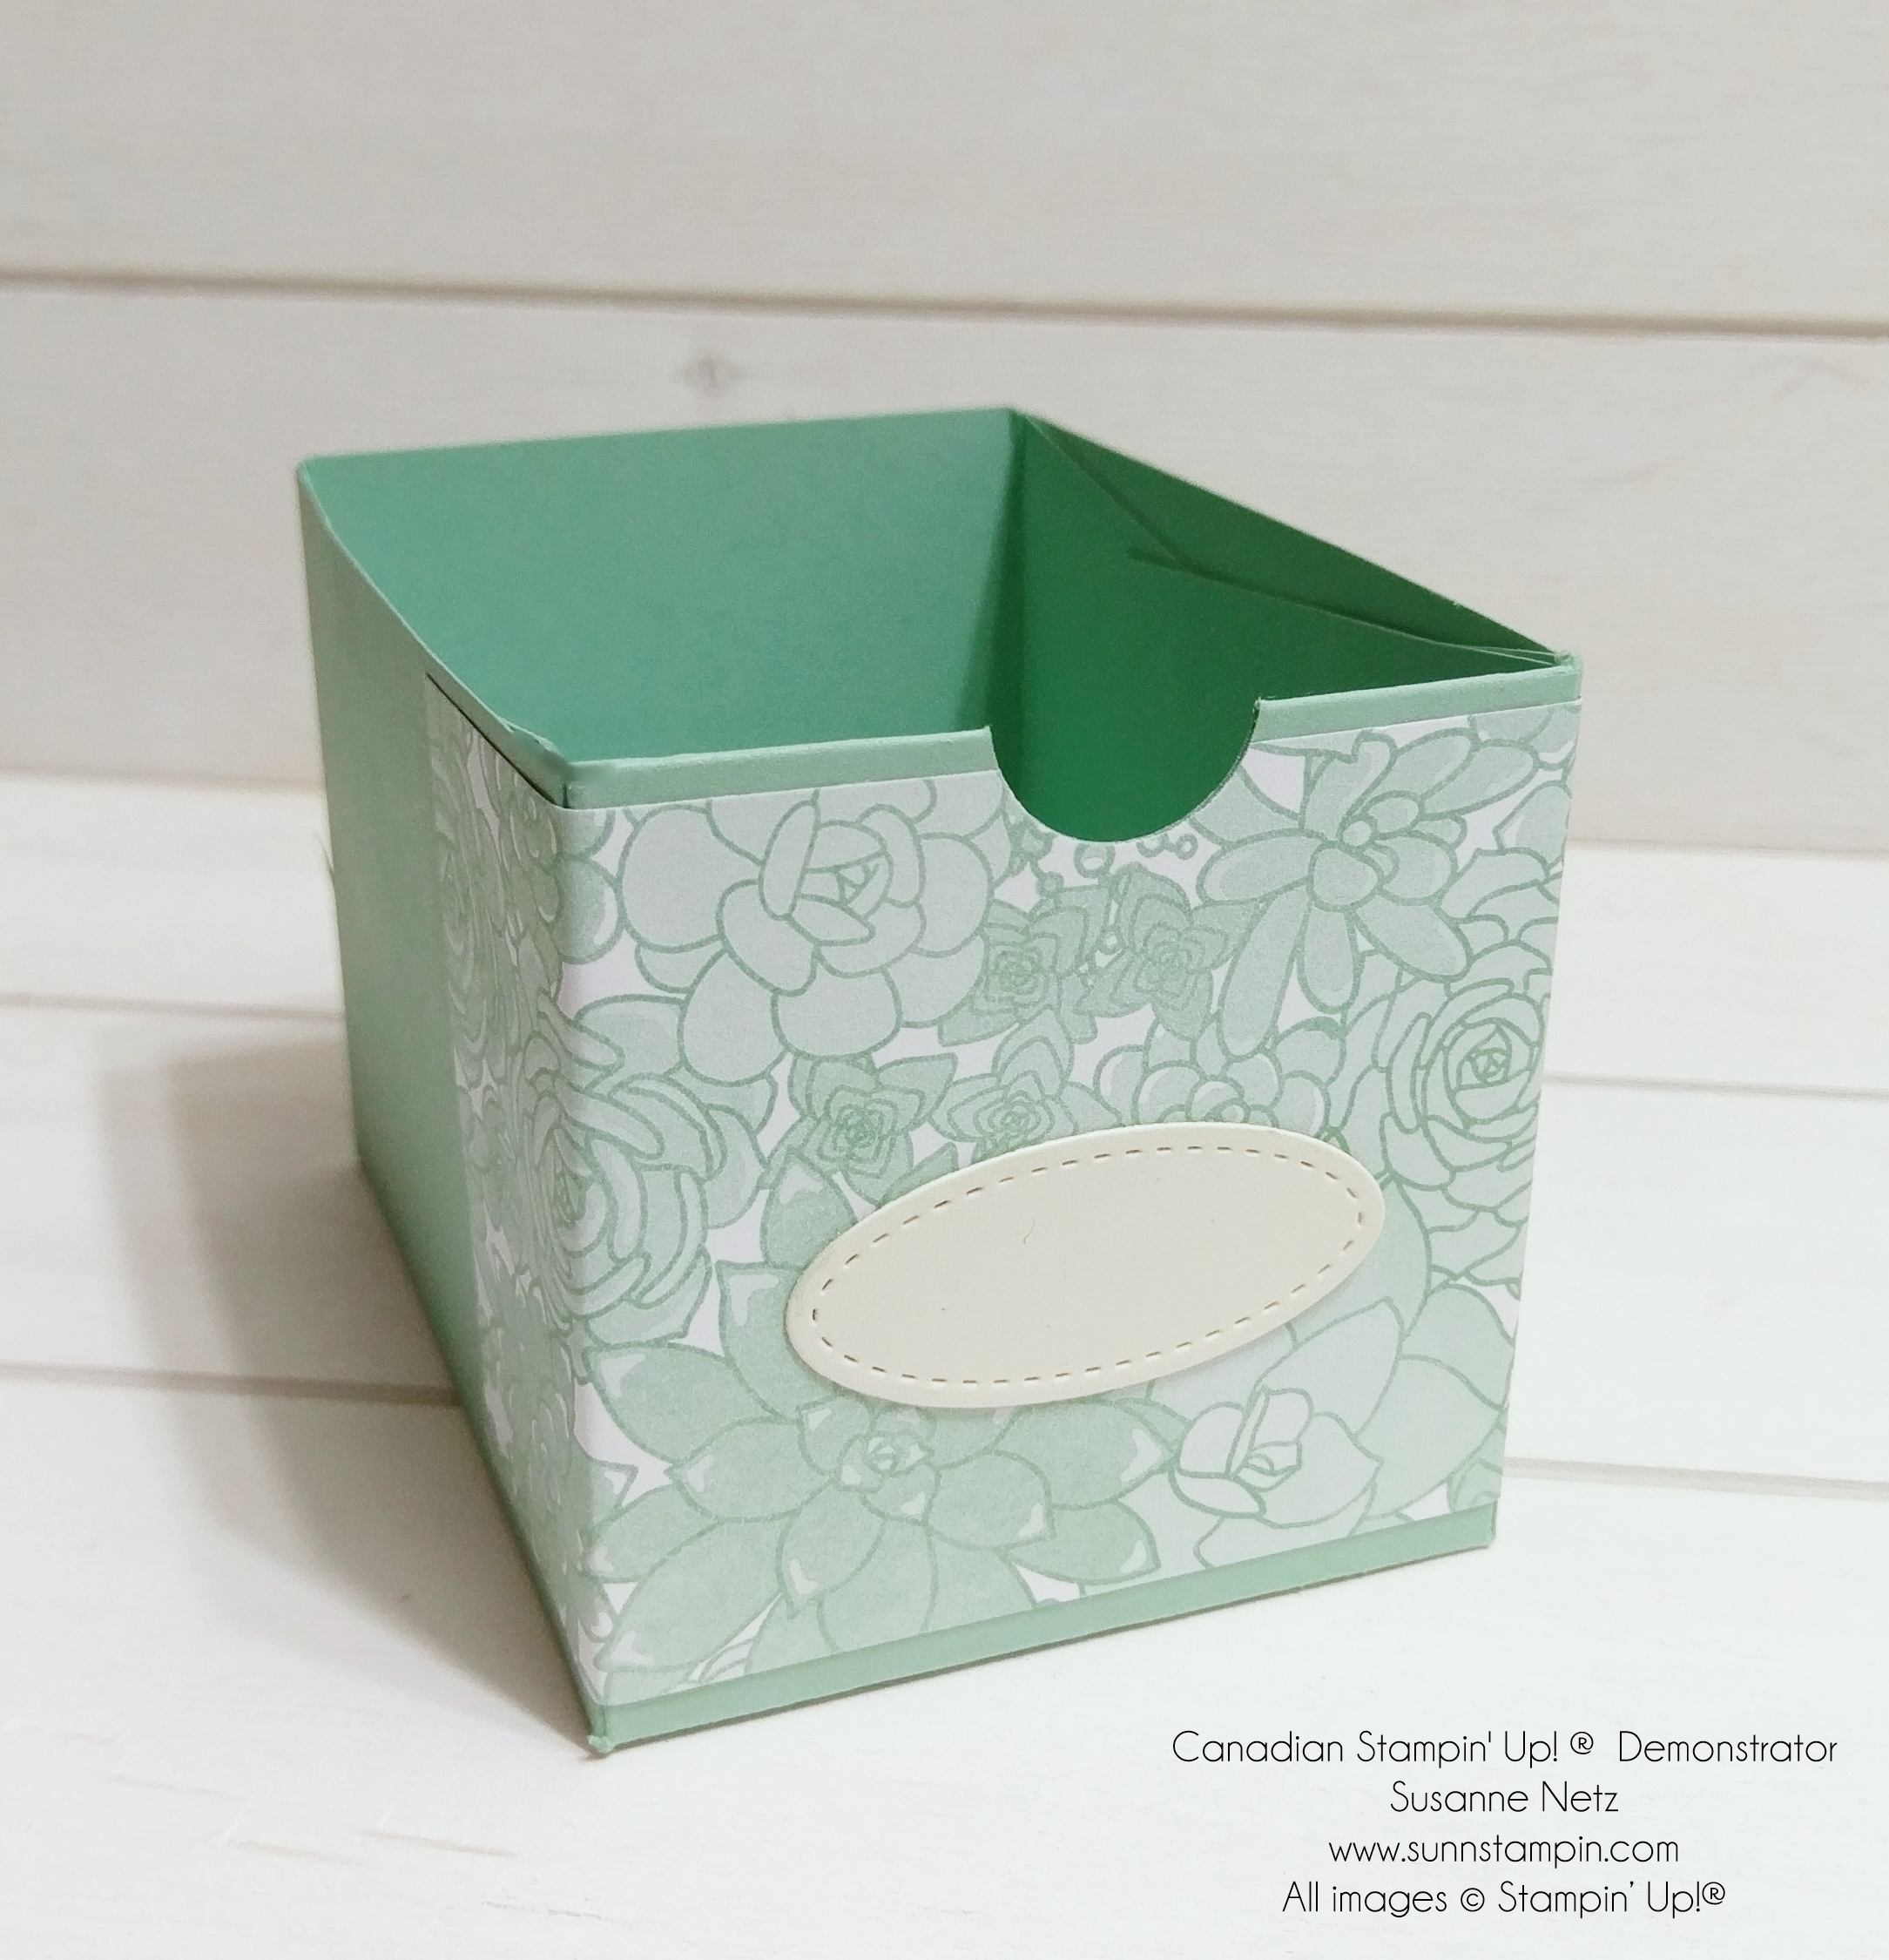
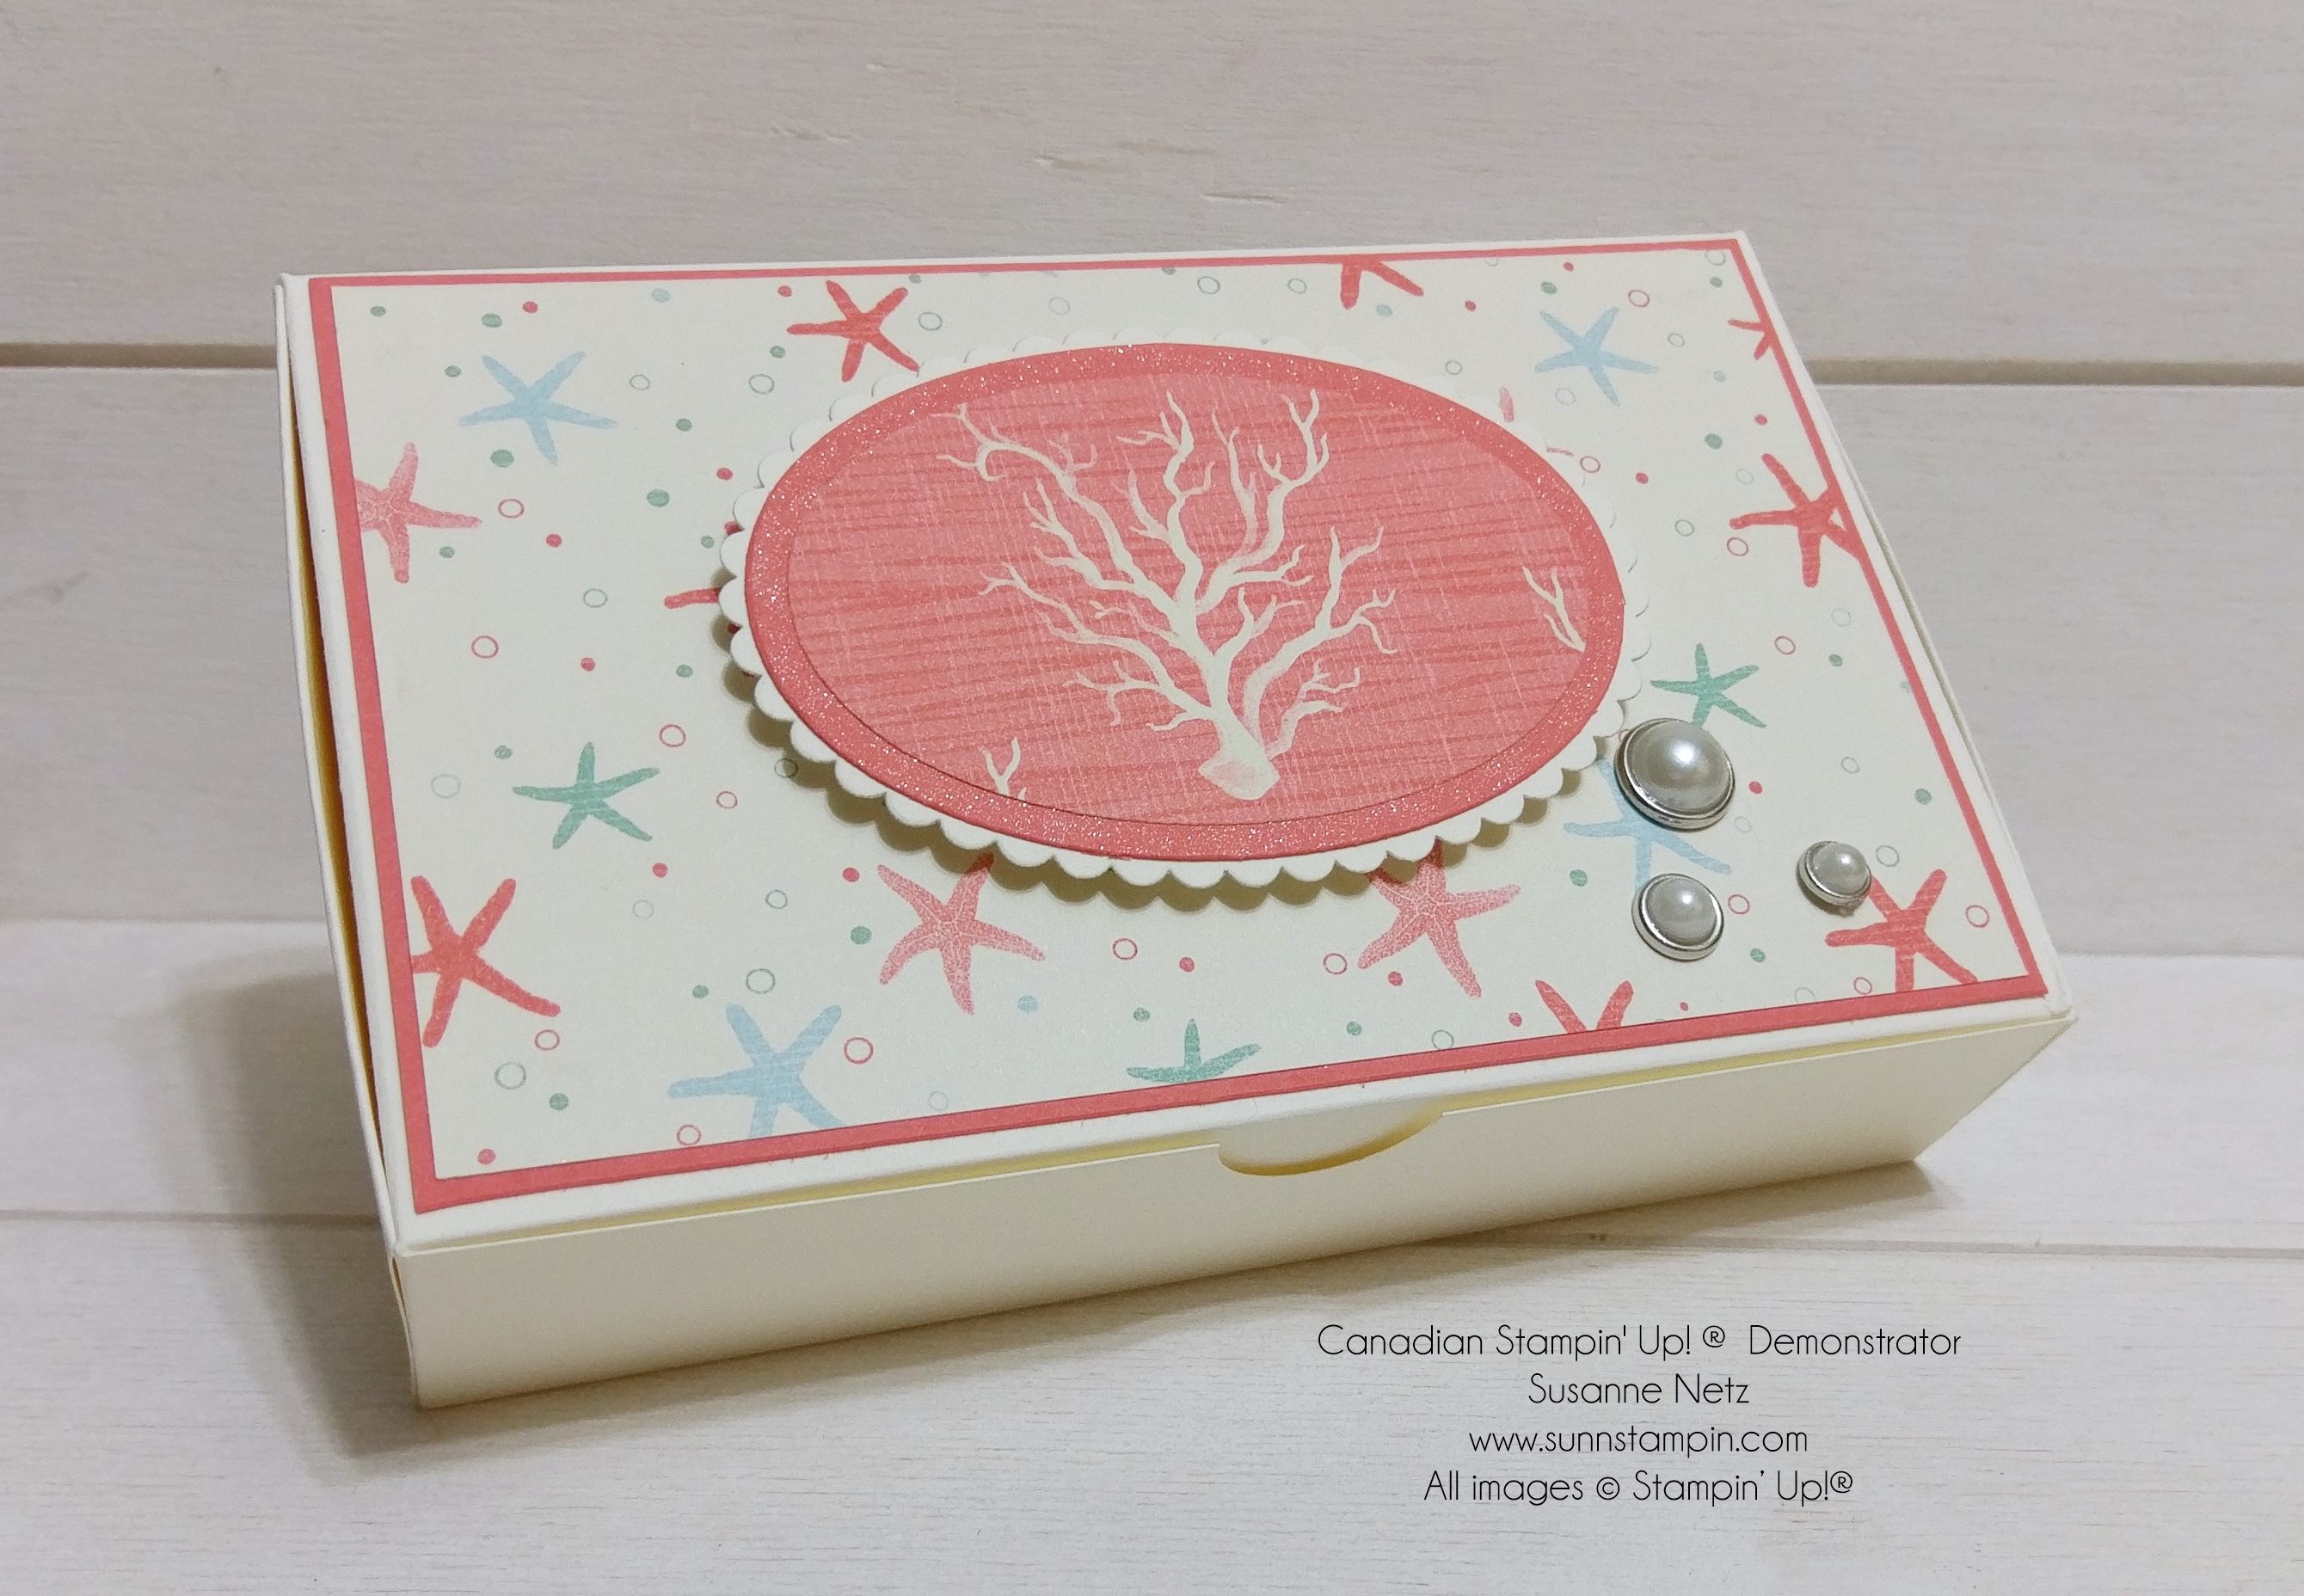
Today’s project would be an excellent one to give to someone special.  A fancy lidded box with a little tip from the Amazing Connie Stewart who thought of an amazing simple tool to help with lidded boxes.  Check out the video if you want to know more.

Above is button to the entire online store.  Below are the links to what I have used on today’s project. Please click on the picture  to be taken to the online store. If you make a purchase after clicking on my link, I receive a small commission as your demonstrator with no extra cost to you. I truly appreciate your support when shopping with me. Please do not hesitate to ask me a question as I am here to help you.   

The Details:

  • Cardstock sizing: (Base) 5 3/4′ X 10
  • scoring:  1 3/4″ on all 4 sides.
  • Cardstock sizing: (Lid) 5 1/4″ x 10″
  • scoring with shim:  1 1/2″ on all 4 sides


Save

Christmas Crush Day 15

Project day!!!!  I have a super cute project to share with you today.  I hope you like it.

Above is button to the entire online store.  Below are the links to what I have used on today’s project. Please click on the picture  to be taken to the online store. If you make a purchase after clicking on my link, I receive a small commission as your demonstrator with no extra cost to you. I truly appreciate your support when shopping with me. Please do not hesitate to ask me a question as I am here to help you. 

The Details:

  • Cardstock sizing: 8 1/4″ x 9 1/2″
  • Long side scoring: 2 1/4″, 4 1/2″ 6 3/4″ and 9″
  • Short side scoring:  2, 5 1/2″ and 7 3/4″.
  • Patterned Paper sizing:  4 each of 3 3/8″ x 2 1/8″.  1 of 2 1/8″ x 2 1/8″.

Christmas Crush Day 10

Hi there.  TGIF!!!  I have a really cute box to share with you today.  I am using my amazing new Specialty Designer Series Paper again.  I seriously can’t get enough of this stuff.  When I was editing the video I thought to myself that for the embellishment (bow) I could have used the new Year of Cheer Washi tape instead of the little strip of foil I used.  You will see in the video but I wanted to state it here that there could be an alternative.  Have you seen the new washi tapes yet?  They are glorious and I highly recommend that you grab some before they retire at the end of December.  I know, we all have too much washi tape but seriously…this stuff is beautiful.

I have been including a shopping link every post during this series because I have had a few people have trouble searching for my name in the online store.  I hope that by placing a one stop shopping button front and center that it helps a few people with their trouble. Did you know that the online store is open 24/7?  Yep, you can shop in your pajamas if you want.  Click the button below to head to the online store.

Here is the project for today.  I hope you give this one a try…it was a seriously quick project.

Here are the links to what I have used on today’s project. Please click on the picture  to be taken to the online store. If you make a purchase after clicking on my link, I receive a small commission as your demonstrator with no extra cost to you. I truly appreciate your support when shopping with me. Please do not hesitate to ask me a question as I am here to help you. 

The Details:

  • Cardstock sizing: 8 1/2″ x 11″
  • Long side scoring:  3″, 5″, 8″, and 10″.
  • Short side scoring:  2″ and 6 1/2″

Patterned Paper sizing:

  • Lid: 4 1/2″ x 1 3/4″  –  Lid Front: 4 1/4″ x 3/4″  – Lid Sides: 1 1/4″ x 3/4″
  • Box Front: 4 1/2″ x 1 3/4″   – Box sides:  1 3/4″ x 1 3/4″   – Box back:  2 3/4″ x 4 1/4″

Bow made with Envelope Punch Board

Bow:  Cardstock 5″ x 1″  line up and punch at 2 1/2″ on both sides.  Line up the ends at 5″ and punch.

Bow Tails:  Cardstock 3″ x 1″.  Punch both sides at 1 1/2″.

Extra:  a wee strip of cardstock approx. 1/4″ wide and let’s say 3″ in length to wrap around the middle of the bow.

Feel free to message me through the contact me page if you have any questions.  Have a great crafting experience.

Save

Christmas Crush Day 5

It’s Friday!!!!  The weekend is almost here and I so hope that you are getting your craft on.  Here is a really cute project for all those great cookies and little gifties that you will inevitably make/buy for your loved ones.

Remember, if you need to browse the store click the button below but if you need more specific links, remember the product picture links before the video will take you right to the item if you want more information.

Here are the links to what I have used on today’s project. Please click on the picture  to be taken to the online store. If you make a purchase after clicking on my link, I receive a small commission as your demonstrator with no extra cost to you. I truly appreciate your support when shopping with me. Please do not hesitate to ask me a question as I am here to help you. 

The Details:

  • Cardstock sizing: 2 pieces of 6″ x 6″
  • scoring: 3 sides score at 1 1/2″ and 1 side 3/4″.

Save

Save

Save

Fabricate Friday – Nugget Holder

Hi there.  I hope you had a great week.  I have a really cute treat holder for you today.  I hope you like it.  Check it out.

Here are the links to what I have used on today’s project. Please click on the picture or wording to be taken to the online store. If you make a purchase after clicking on my link, I receive a small commission as your demonstrator with no extra cost to you. I truly appreciate your support when shopping with me. Please do not hesitate to ask me a question as I am here to help you. 

The Details:

  • Cardstock sizing: 3″ x 7 1/2″
  • Long side scoring: 1 3/8, 1 7/8″ 3 1/4″ and 3 3/4″
  • Patterned Paper sizing:  2 3/4″ x 1 1/8″ and 2 3/4″  x 1 5/8″

Save

Fabricate Friday – Tea Box

Hello there.  It’s Friday and that means another 3D project for you.  This one is a gooder!  Hope you like it.  Check it out.

Here are the links to what I have used on today’s project. Please click on the picture or wording to be taken to the online store. If you make a purchase after clicking on my link, I receive a small commission as your demonstrator with no extra cost to you. I truly appreciate your support when shopping with me. Please do not hesitate to ask me a question as I am here to help you. 

Naturally Eclectic Designer Series Paper

Corrugated Elements

Coffee Cups Framelits Dies

Big Shot

Big Shot Magnetic Platform

Tabs For Everything Photopolymer Stamp Set

Lemon Lime Twist 8-1/2" X 11" Cardstock

Simply Scored

Bone Folder

Paper Snips Scissors

Fast Fuse Adhesive

Linen Thread

Stampin' Dimensionals

Subtles Enamel Shapes

The Details:

  • Cardstock sizing for Box:  8″ x 3 3/4″
  • Long side scoring: 1 1/8″, 3 3/4″, 4 7/8″ and 7 1/2″.
  • Short side scoring: 3/4″
  • Patterned Paper sizing: (front and back) 2 3/8″ x 1 3/4″.


  • Cardstock sizing for Lid:   4 5/8″ x 3 1/4″
  • Scoring: score on all sides at 1″.
  • Patterned Paper sizing: Top:  1″ x 2 3/8″.  Front & Back 2 3/8″ 1 3/4″

Save

Fabricate Friday – Patterned Paper Treat Pouch

Hello there my friends.  I was watching some videos a while back and came across this build from the lovely and talented Linda Parker (Papercraft with Crafty) and thought I would share a spin on it.  She used card stock in her version but I wanted to use my beautiful designer series paper to build it.  Hope you like the version I share.

Here are the links to what I have used on today’s project. Please click on the picture or wording to be taken to the online store. If you make a purchase after clicking on my link, I receive a small commission as your demonstrator with no extra cost to you. I truly appreciate your support when shopping with me. Please do not hesitate to ask me a question as I am here to help you. 

The Details:

  • Patterned Paper sizing: 8 3/4″ by 4 1/2″
  • Long side scoring: 2 3/4″, 3 1/2″, 7″

Save

Fabricate Friday – Curled Corner Box

Oh. My. Goodness.  Check this little beauty out.  What an absolute perfect treat holder for that man of yours.

Here are the links to what I have used on today’s project. Please click on the picture or wording to be taken to the online store. If you make a purchase after clicking on my link, I receive a small commission as your demonstrator with no extra cost to you. I truly appreciate your support when shopping with me. Please do not hesitate to ask me a question as I am here to help you. 

The Details:

  • Cardstock sizing: 5 1/2″ x 5 1/2″
  • Scoring at 1 1/4″, and 1 1/2″ on all sides.

Fabricate Friday – Tissue Box

Hello all.  I hope you are doing well.  As you may have heard I am a bit displaced at the moment.  I live in a basement suite and the shared laundry equipment (meaning the washer) decided to overflow into my apartment.  So, needless to say, I had to relocate while they dry the place up and replace the floors and carpets.  Before you ask, I am ok, the kitties are ok and nothing was damaged other than my apartment floors.  I have moved Molly and Quinn to a friend’s home who is quiet and loves pets but I myself have relocated to my sister’s house while she and her family are on vacation.  I was scheduled to look after her kitties anyway so it works out ok.  I miss my kitties but I go to see them every day and spend time (I have been editing my videos there and trying to let them know things are kinda the same only different).  They haven’t adjusted as well as I had hoped but they are getting better every day.  I wish they would eat a little more, they kinda have been off their food for a bit but they do eat the treats we give them so…they aren’t suffering too bad.  Kids and their junk food eh?  My sister has ample room for me to set up a make shift craft space so I will still be able to continue to product content for the blog here.  Would love if I had some shoppers to make it all worth while.  🙂  New Catalog is launched today!  You can shop 24/7 in the online store.

Anyway, just a bit of an update and while I am feeling a little sad with them not being around me I thought I would grab a tissue.  Hmmm, wonder if I can make a little box to hold my tissues to cheer me up!  Great segway there don’t you think?

Check out my project for today and I will show you how to do it.

Here are the links to what I have used on today’s project. Please click on the picture or wording to be taken to the online store. If you make a purchase after clicking on my link, I receive a small commission as your demonstrator with no extra cost to you. I truly appreciate your support when shopping with me. Please do not hesitate to ask me a question as I am here to help you. 

The Details:

  • Cardstock sizing: 11″ x 4 1/4″
  • Long side scoring: 1/2″, 3″, 4″, and 6 1/2″.
  • Patterned Paper sizing: 3 1/4″ x 4″ and 3/4″ x 4″


Fabricate Friday – Cute Note Pads

Ooooh, a crafty project today.  No boxes in sight though.  I hope you enjoy this sweet little gem and save some of that packing board that comes in our glitter packs.  These little note pads are awesome for your desk, or for gifts for students.  So cute!

Here are the links to what I have used on today’s project. Please click on the picture or wording to be taken to the online store. If you make a purchase after clicking on my link, I receive a small commission as your demonstrator with no extra cost to you. I truly appreciate your support when shopping with me. Please do not hesitate to ask me a question as I am here to help you. 

The Details:

  • Cardboard sizing:  4 1/4″ x 5 1/4″
  • Note Paper sizing:  4 1/4″ x 5 1/4″
  • Patterned Paper sizing: 6″ x 7″

Save

Save

Fabricate Friday – Delightful Daisy Box

Well hi.  I am so excited to bring you this little nugget of pure daisy pleasure today.  I hop you like the project.

Here are the links to what I have used on today’s project. Please click on the picture or wording to be taken to the online store. If you make a purchase after clicking on my link, I receive a small commission as your demonstrator with no extra cost to you. I truly appreciate your support when shopping with me. Please do not hesitate to ask me a question as I am here to help you. 

The Details:

  • Cardstock sizing: 8″ x 8″
  • One side scoring: 5/8″, 3 5/8″, and 5 7/8″
  • The other side scoring: 3/4″, and 5″.
  • Patterned Paper sizing:
    • Lid: 2 3/4″ x 4″
    • Sides: 2 3/4″ x 2″
    • Front and back: 4″ x 2″

Save

Fabricate Friday – A Coffee Cafe Box

Well, this Friday I am sharing with you a big box project.  I thought it would be really nice if one was to tuck inside the box a bag of coffee beans.  This is what I came up with for that.  Isn’t it awesome?  I just love it.  So perfect for that coffee lover in your life.

Here are the links to what I have used on today’s project. Please click on the picture or wording to be taken to the online store. If you make a purchase after clicking on my link, I receive a small commission as your demonstrator with no extra cost to you. I truly appreciate your support when shopping with me. Please do not hesitate to ask me a question as I am here to help you. 

The Details:

  • Cardstock sizing: 12″ x 12″.
  • One side scoring: 1/2″, 3 1/2″, and 10″.
  • The other side scoring: 3″, 5 3/4″, 8 3/4″ and 11 1/2″.
  • Patterned Paper sizing:
    • Front and back: 2 1/2″ x 6 1/4″.
    • Sides: 2 3/4″ x 6 1/4″.
    • Top: 2 1/2″ x 2 3/4″.

Save

Save

Fabricate Friday – A Funky Triangle Box

So let me tell you a story.  I have a wonderful friend named Lee.  She is very helpful and she is very kind.  One day she came into get her hair done and was so proud to give me a box.  It was really unusual but looked amazing and she said it was from a Chocolate shoppe in Las Vegas.  I was totally impressed and was excited to open it and receive a Las Vegas Chocolate.  Alas, there was no chocolate…none.  She had eaten it but saved me a box so I can remake it for you.  I shall now console you for not having a chocolate as well.  I hope your disappointment will fade as mine did when I discovered how really cool this build is.  PS Lee, if you are reading this.  Please don’t bring a chubby girl a chocolate box without a chocolate…this diet is killing me.

On with the show…

Here are the links to what I have used on today’s project. Please click on the picture or wording to be taken to the online store. If you make a purchase after clicking on my link, I receive a small commission as your demonstrator with no extra cost to you. I truly appreciate your support when shopping with me. Please do not hesitate to ask me a question as I am here to help you. 

The Details:

  • Cardstock or in this case DSP sizing: 9 x 7 1/2″
  • Long side scoring: 1/2″, 1″, 1 1/4″ 4 3/8″ and 5 7/8″
  • Short side scoring: 3″, 4 1/2″

Notes.

-score on all lines, on the long side with small scores on the left, tick at 5 1/8″ and then flip the paper over and tick again at 5 1/8″.

-from the tick like to intersecting middle score lines hand score a triangle.

-draw lines at 3/4″ around each original score line.

-cut on hand drawn outer score lines.

Save

Fabricate Friday – A mini box

Hello there.  I hope you are planning to do some crafting this weekend.  I have a super fun and cute mini box to share with you today.  It’s perfect for that pair of earrings you bought your sister for her birthday!  My sister’s birthday is coming up and I should look into getting her something nice.  It’s on my to do list!  Anyway, here is the project for today…check it out.

Here are the links to what I have used on today’s project. Please click on the picture or wording to be taken to the online store. If you make a purchase after clicking on my link, I receive a small commission as your demonstrator with no extra cost to you. I truly appreciate your support when shopping with me. Please do not hesitate to ask me a question as I am here to help you.   

The Details:

  • Cardstock sizing: 6 3/4″ x 3 1/4″
  • Long side scoring:  1/2″, 2 3/4″ 3 1/4″ and 5 1/2″
  • Short side scoring: 1/2″ on each side.

Save

Fabricate Friday – Card Pack Box

Hello there.  I have made it my mission to really create with the “and More” part of the new Memories and More card packs.  I do not do pocket memory keeping and that is what part of the card packs are made for the other part is for…well, anything you would use paper on.

I really like using the paper for boxes and 3D items as it has more strength than patterned paper.  Today’s project however is not showing that particular quality, rather, I’m sharing the beautiful smaller pages and how they can be easily added to a rather dull box to brighten it up. Check it out.

Here are the links to what I have used on today’s project. Please click on the picture or wording to be taken to the online store. If you make a purchase after clicking on my link, I receive a small commission as your demonstrator with no extra cost to you. I truly appreciate your support when shopping with me. Please do not hesitate to ask me a question as I am here to help you. 

The Details:

  • Cardstock sizing: 6 3/8″ x 9 3/4″
  • Long side scoring:  1″, 4 3/8″, 5 3/8″ and 8 3/4″.
  • Short side scoring:  1″, 5 3/8.
  • Patterned Paper sizing: 3 7/8″ by 2 7/8 (the exact size of one of the smaller Memories & More Cards, yes I did that on purpose)

Save

Save

Fabricate Friday – Coffee Treat Holder

Well, TGIF.  I have a lovely project for you today using the Coffee Cafe bundle.  I really like this set and I also have created an online course for this bundle.  How exciting right?  Anyway, down to the business of the day, check out the project below.

Here are the links to what I have used on today’s project. Please click on the picture or wording to be taken to the online store. If you make a purchase after clicking on my link, I receive a small commission as your demonstrator with no extra cost to you. I truly appreciate your support when shopping with me. Please do not hesitate to ask me a question as I am here to help you. 

The Details:

  • Cardstock sizing: 2″ x 11″
  • Long side scoring:  1/2″, 1″, 4″, 4 1/2″, 7 1/2″ and 9.
  • Short side scoring: 1/2″ on each side.
  • Patterned Paper sizing: 2″ x 1″ and 3″ x 1″

Save

Save

Fabricate Friday – Celebrate Box

It’s almost the weekend, I hope you all have time to do a little crafting.  I have a really cute project for you today.  Check this sweet box out.

Here are the links to what I have used on today’s project. Please click on the picture or wording to be taken to the online store. If you make a purchase after clicking on my link, I receive a small commission as your demonstrator with no extra cost to you. I truly appreciate your support when shopping with me. Please do not hesitate to ask me a question as I am here to help you. 

The Details:

  • Cardstock sizing: 81/2″ x 5 1/2″
  • Long side scoring: 3 1/2″, 4″, 7 1/2″ and 8.
  • Short side scoring: 1/2″, 1, 4 1/2″, and 5″
  • Patterned Paper sizing: 3 1/4″ x 3 1/4″  smaller layer is 2 3/4″ x 2 3/4″.

Fabricate Friday – Watercolour Pencil Wrap

Hello there.  I have a really awesome project to share with you today.  It’s an artist’s wrap for your watercolour pencils…made with cardstock!!!  I was looking for a storage solution for my water colour pencils and this is what I came up with.  I love it and it’s very easy to use and store away.  It’s affordable, durable, cute, and works really well and it’s exactly what I wanted.  Check it out.

Here are the links to what I have used on today’s project. Please click on the picture or wording to be taken to the online store. If you make a purchase after clicking on my link, I receive a small commission as your demonstrator with no extra cost to you. I truly appreciate your support when shopping with me. Please do not hesitate to ask me a question as I am here to help you. 


The Details:

Cover Cardstock sizing:  8 1/2″ by 6 1/2″

  • Long side scoring: 1/2″, 2″, 3″, 4 1/2″, 6″, and 7 1/2″.

Inner Boxes Cardstock sizing: 3 pieces sized at 4 3/8″ by 4 1/8″

  • Long side scoring: 3/8″
  • Short side scoring:  3/8″, 3/4″, 2 1/2″, and 2 5/8″.

Extra Support pieces:  4″ by 1 1/2″.

Save

Save

Save

Fabricate Friday – Lemon Lime goes with everything…

Hello there.  I have decided that the new In-colour Lemon lime twist goes with everything.  It’s like the colour that compliments almost everything.  I have not tried it with purples yet but that may be next.  Lol.  So, here is my sweet little project today and I used lemon lime twist as the base for the box.  The patterned paper is delightful daisy and, as I say in the video…it does not have any lemon lime in it but that colour sure goes well with the paper.  Check it out.

Here are the links to what I have used on today’s project. Please click on the picture or wording to be taken to the online store. If you make a purchase after clicking on my link, I receive a small commission as your demonstrator with no extra cost to you. I truly appreciate your support when shopping with me. Please do not hesitate to ask me a question as I am here to help you. 

Product List

The Details:

Bottom or Base Cardstock sizing: 5″ by 3 1/4″

  • Long side scoring:1/2″, 1 1/4″, 2 3/4″, and 3 1/2″.
  • Short side scoring: 3/4″

Lid Patterned Paper sizing: 5″ by 2 1/2″

Long side scoring: 1/2″, 1 1/4″, 2 3/4, and 3 1/2″ (using a shim)

Short side scoring: 3/4″


Save

Fabricate Friday – Deck ‘o’ Cards(tock)

Hello there.  Just thought I would shine a little light on one of the tools that I use for design.  Years ago, Stampin’ Up! used to have a similar product called “The Colour Coach” and it was similar to what I use today except I use real card stock and I tend to pull the cards out and check to see if I like the colour combinations together.  Many times I take my cues from the patterned paper where the colours are listed but sometimes I just want to do my own thing.  That’s where this deck of cards comes in.  However, I needed something to house them all in so I thought that you may be interested in something like this as well.  Check it out.

Here are the links to what I have used on today’s project. Please click on the picture or wording to be taken to the online store. If you make a purchase after clicking on my link, I receive a small commission as your demonstrator with no extra cost to you. I truly appreciate your support when shopping with me. Please do not hesitate to ask me a question as I am here to help you.

The Details:

Cardstock sizing:   10 5/8″ by 4 5/8″

Long side scoring: 7/8″, 1 3/4″ 5 3/4″ and 6 5/8″

Short Side scoring:  7/8″ and 3 3/4″.

Save

Late Friday Fabricate – Rewards Package

Hello there.

This is my second attempt at this post.  Good grief, when stuff goes wrong it can really cause a panic.  I had a really busy day at work today and I couldn’t get home to fix the problem fast enough.  Thank you all for your patience.

So…anyway.  I hope you are well and that your week wasn’t too tiring. I did a quick video today showing how I decorate the FREE STAMP SET my customers get when they keep track of their online purchases with me using the Loyalty Program Tracking Sheet. Of course the paper and decorations change but this is pretty much what I send out. I thought that this may help you if you wanted to gift a DVD or a stamp set as well. Check it out.

Here are the links to what I have used on today’s project. Please click on the picture or wording to be taken to the online store. If you make a purchase after clicking on my link, I receive a small commission as your demonstrator with no extra cost to you. I truly appreciate your support when shopping with me. Please do not hesitate to ask me a question as I am here to help you.

The Details:

Cardstock sizing: 10 3/4″ by 10 3/4″

  1. Using the envelope punch board line up the left side of the patterned paper at 4 1/4″ then punch and score. Slide the paper to the left and score at 5″.
  2. Rotate 180 degrees.
  3. Punch and score at 4 1/4″ and again at 5″.
  4. Flip the paper and rotate one turn so you have your diagonal score lines on the right and punch and score at 4 1/4″ and again at 5″ (this is basically so you have the punches on all 4 sides and the scores all the way along the paper.)
  5. Line up the score lines with the score guide and finish scoring the square…no need to punch here.
  6. Rotate the paper and do the same on the bottom of the paper.
  7. Fold, burnish, and cut following instructions in the video.


Save

Save

Save

Save

Save

Fabricate Friday – Hugs Box

Hello all.  I hope you are having a great day.  It’s Friday after all!  I have a super awesome project to share with you today.  I really am loving working with new product and really can’t wait to make more fun things!  However, I have to calm my jets here and show you what I have created today.  I absolutely love it and I hope you do too.  Check it out.

Here are the links to what I have used on today’s project. Please click on the picture or wording to be taken to the online store. If you make a purchase after clicking on my link, I receive a small commission as your demonstrator with no extra cost to you. I truly appreciate your support when shopping with me. Please do not hesitate to ask me a question as I am here to help you. 

The Details:

Cardstock sizing:  2 pieces sized 10 1/2″ by 7 1/2″

  • Long side scoring: 1/2″, 4″, and 7 1/2″
  • Short side scoring:  1/2″ and 4″

Cardstock mat: 5 pieces sized 3 3/8″ by 3 3/8″

Patterned paper: 5 pieces sized 3 1/3″ by 3 1/4″


Save

Fabricate Friday – Love and Hugs Box

Hello there.  It’s Friday again and that means project time.  Don’t you just love that we can make our own little gifty boxes that we can use to brighten someone’s day?  I do.  I do try to announce when one of these boxes you can make ahead and then store away until the need arises.  This one today isn’t really a fold flat box.  However, if you omitted adhering the bottom flaps together it would be…so there’s that.  Anyway, I am excited to share this with you as it’s using one of the new cardstock colours that have just arrived.  I really like all of them.  Honest.  I would tell you if I didn’t.  I really didn’t like cucumber crush and I am kinda glad that it’s gone.  But this new cardstock colour I am using today is gorgeous.  Can you guess which one it is?  Check it out.

That’s a bit of tranquille tide right there for you AND the new patterned paper called delightful daisy.  I hope you like the video it’s down below.  🙂

Here are the links to what I have used on today’s project. Please click on the picture or wording to be taken to the online store. If you make a purchase after clicking on my link, I receive a small commission as your demonstrator with no extra cost to you. I truly appreciate your support when shopping with me. Please do not hesitate to ask me a question as I am here to help you. 

(Please note: Ribbon of Courage Stamp Set is not available until the catalog goes live June 1, 2017.  The item number for this stamp set is #143855).

The Details:

Cardstock sizing: 9 1/2″ by 8 1/8″

  • Long side scoring: 1/2″, 2″, 5″, and 6 1/2″.
  • Short side scoring:  5/8″, 2 1/8″, and 6 3/4″

Patterned paper measurements:

  • For the front and back: 2 3/4″ by 4 3/8″
  • For the 2 sides: 1 1/4″ by 4 3/8″.
  • For the lid: 1 1/4″ by 2 3/4″

Save

Save

Fabricate Friday – Organizer Box

Hello there.  I have been working on a project that I thought you may be interested in.  I thought that maybe you may need something like this in your craft room.  The salon where I work offers clients tea while they visit and our tea caddy was looking a bit tired so I decided to make a new one.  Here’s what one of the boxes looks like.  I made 23 of them and then slipped them into a wooden crate I bought at Michael’s.  I show the full thing in the video.  Check it out.

Here are the links to what I have used on today’s project. Please click on the picture or wording to be taken to the online store. If you make a purchase after clicking on my link, I receive a small commission as your demonstrator with no extra cost to you. I truly appreciate your support when shopping with me. Please do not hesitate to ask me a question as I am here to help you. 

The Details:

Cardstock sizing: 8 1/4″ by 11″

  • Long side scoring:  1 3/4″, 4 1/2″, and 8 1/4″.
  • Short side scoring: 2 3/4″ and 5 1/2″

Patterned Paper:  2 1/2″ by 5 1/2″.

Save

Fabricate Friday – Seaside Box

Hello and welcome.  I hope you are having a nice Friday.  I have a seaside themed project to share today.  Check it out.

Here are the links to what I have used on today’s project. Please click on the picture or wording to be taken to the online store. If you make a purchase after clicking on my link, I receive a small commission as your demonstrator with no extra cost to you. I truly appreciate your support when shopping with me. Please do not hesitate to ask me a question as I am here to help you. 

The Details:

Cardstock sizing: 10″ x 10 1/2″

  • Long side scoring: 1 1/4″, 4 3/4″, 6. and 9 1/2″.
  • Short side scoring: 1″, 2 1/4″, 7 3/4″ and 9″.

Cardstock Mat: 3 3/8″ by 5 3/8″.  Patterned Paper sizing: 3 1/4″ by 5 1/4″.

Save

Save

Save