Why is it that when things are smaller they are cute. Small humans, small dogs, cats, giraffes, hippos even small alligators! When things are small we like them a lot more than when they are regular size. Well here is a really cute 2″ box that has so many applications. Check it out.
Above is button to the entire online store. Below are the links to what I have used on today’s project. Please click on the picture to be taken to the online store. If you make a purchase after clicking on my link, I receive a small commission as your demonstrator with no extra cost to you. I truly appreciate your support when shopping with me. Please do not hesitate to ask me a question as I am here to help you. Did you know that if you shop with me you will be invited in to a VIP Social Club on Facebook where there is exclusive videos, projects, inspirations, giveaways and fun? Click that shop now button to become a SuNN VIP Society Member.
This project is super cute. I just love how things fall into place together when one is crafting. Check it out.
Above is button to the entire online store. Below are the links to what I have used on today’s project. Please click on the picture to be taken to the online store. If you make a purchase after clicking on my link, I receive a small commission as your demonstrator with no extra cost to you. I truly appreciate your support when shopping with me. Please do not hesitate to ask me a question as I am here to help you. Did you know that if you shop with me you will be invited in to a VIP Social Club on Facebook where there is exclusive videos, projects, inspirations, giveaways and fun? Click that shop now button to become a SuNN VIP Society Member.
Ok my friends. We have one more day to enjoy the sales of Sale-A-Bration. It’s almost the end. The free gift with purchase is nearing the end. One of the most fancy free items this year was the Springtime Foil Paper. This was just absolutely gorgeous 12 x 12 paper and today I am sharing a very fancy box using that paper. So pretty! I mention in the video that one wouldn’t be able to get this paper anymore but there is still time. Only a few hours but still. I hope you get the opportunity to get this paper free with purchase. Check my project out.
Above is button to the entire online store. Below are the links to what I have used on today’s project. Please click on the picture to be taken to the online store. If you make a purchase after clicking on my link, I receive a small commission as your demonstrator with no extra cost to you. I truly appreciate your support when shopping with me. Please do not hesitate to ask me a question as I am here to help you. Did you know that if you shop with me you will be invited in to a VIP Social Club on Facebook where there is exclusive videos, projects, inspirations, giveaways and fun? Click that shop now button to become a SuNN VIP Society Member.
Product List
The Details:
Cardstock sizing: Bottom 11″ x 11″, Top 9″ x 9″.
Scoring on both sides: Bottom: 4″ and 7″. Top 3″ and 6″ (with shim).
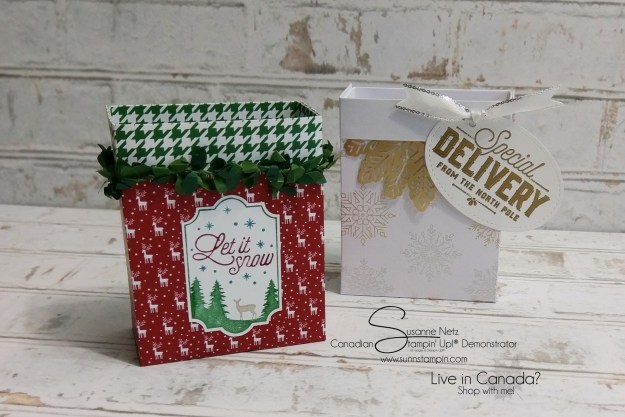
TGIF. Glad you stopped by. I have a really fun box build to share with you today. I hope you like it. It can hold 3″ x 3″ cards or really anything that is that size…perhaps tea bags or chocolate wafers. The list is endless. Check out the project.
Above is button to the entire online store. The website that does all the fancy stuff to create the links for you to click on was offline so I can’t apply the supplies I used. If you have any questions about anything just email me.
The Details:
Cardstock sizing: 8 1/2″ x 11″
Long side scoring: 1 3/4″, 5 1/4″, 7″ and 10 1/2″
Short side scoring: 1 1/2″, 3 1/4″ and 6 3/4″
Patterned Paper sizing: 1 piece sized 3 1/4″ x 3 1/4″ for the back. 3 pieces sized at 1 1/2″ x 3 1/4 for the sides and top. 1 piece 3 1/4″ x 1 3/4″ for the bottom front and 3 1/4″ x 1 1/4″ for the top front.
It’s Friday! Another fun 3D project. Yay! This lovely box has 2 dividers inside that would be ideal for a special Easter treat, a Mother’s day gift or to keep some of your crafty items safe on your desk. Check it out.
Above is button to the entire online store. Below are the links to what I have used on today’s project. Please click on the picture to be taken to the online store. If you make a purchase after clicking on my link, I receive a small commission as your demonstrator with no extra cost to you. I truly appreciate your support when shopping with me. Please do not hesitate to ask me a question as I am here to help you. Did you know that if you shop with me you will be invited in to a VIP Social Club on Facebook where there is a lot of exclusive videos, projects, inspirations, giveaways and fun? Click that shop now button to become a SuNN VIP Society Member.
Hiya, TGIF. I have a fun way to wrap a guy’s birthday card! Or really any one can tailor the design to be masculine or feminine or even for a wee human. Check it out.
Above is button to the entire online store. Below are the links to what I have used on today’s project. Please click on the picture to be taken to the online store. If you make a purchase after clicking on my link, I receive a small commission as your demonstrator with no extra cost to you. I truly appreciate your support when shopping with me. Please do not hesitate to ask me a question as I am here to help you. Did you know that if you shop with me you will be invited in to a VIP Social Club on Facebook where there is a lot of exclusive videos, projects, inspirations, giveaways and fun? Click that shop now button to become a SuNN VIP Society Member.
TGIF. I hope you had a nice week and are headed into the weekend to get your craft on. Do you know what I am doing this weekend? Deep cleaning appliances. You know it has to be done and I have been dreading it but since I am moving into a new apartment I know it has to be done. I keep a pretty tidy house so it won’t be too bad (I hope).
Anyway, moving on to today’s project and away from my moving house chores…do you know a person who would fit the bill of being one of the loveliest people you know? If so, here is a box for you to make to give to them. 🙂
Above is button to the entire online store. Below are the links to what I have used on today’s project. Please click on the picture to be taken to the online store. If you make a purchase after clicking on my link, I receive a small commission as your demonstrator with no extra cost to you. I truly appreciate your support when shopping with me. Please do not hesitate to ask me a question as I am here to help you.
I gotta say, I really like the Tutti Fruity Designer Series Paper. Especially for treat boxes and the like. For today’s project I used it again and this time NO Stamping. The treat box was so cute I didn’t have to. Check it out.
I have been asked a million times about the magnets. Here is a link to the exact same size that I purchased. 8 x .5 mm Magnets. I hope this helps you. I have been getting messages about the fact that Spider Magnets is sold out of these ones. I just want to mention here that I bought these back in 2016 and have not had the need to replenish. I am certain that the link above is the very same product. However, purchase at your own risk as I can not give you a review.
Above is button to the entire online store. Below are the links to what I have used on today’s project. Please click on the picture to be taken to the online store. If you make a purchase after clicking on my link, I receive a small commission as your demonstrator with no extra cost to you. I truly appreciate your support when shopping with me. Please do not hesitate to ask me a question as I am here to help you.
Hello there. First and foremost I need to apologize to any customers who were directed by me in my newsletter 2 days ago to shop for the Fast Fuse special. I am really sorry that many of you were not able to get in on the special. The Stampin’ Up! warehouse sold out in 8 hours. I did not anticipate this as they had assured us Demonstrators that they would have enough product to go around. It makes me feel really sorry that I encouraged you to get shopping and then it was a bum deal. Honestly, I don’t know what happened. I want to apologize to you all on behalf of Stampin’ Up! It sucks.
Moving on from FuseGate, I have a really cute project for your Valentine needs. Check out this super cute creation.
Above is button to the entire online store. Below are the links to what I have used on today’s project. Please click on the picture to be taken to the online store. If you make a purchase after clicking on my link, I receive a small commission as your demonstrator with no extra cost to you. I truly appreciate your support when shopping with me. Please do not hesitate to ask me a question as I am here to help you.
Hi. I have a really cute project to share with you today. Fridays are always fun because I always feature a paper crafting project that one can make if they just have a score board and a piece of cardstock. This one came together so very quickly. I hope you enjoy it.
Above is button to the entire online store. Below are the links to what I have used on today’s project. Please click on the picture to be taken to the online store. If you make a purchase after clicking on my link, I receive a small commission as your demonstrator with no extra cost to you. I truly appreciate your support when shopping with me. Please do not hesitate to ask me a question as I am here to help you.
TGIF. It’s Friday and it’s box creation time. I have been on a kick recently trying to find ways of using all my patterned paper I got from the share I took part in. I made some note cards and then devised a box to house them. I think I may use them for gifts at some point. Check out today’s project.
Above is button to the entire online store. Below are the links to what I have used on today’s project. Please click on the picture to be taken to the online store. If you make a purchase after clicking on my link, I receive a small commission as your demonstrator with no extra cost to you. I truly appreciate your support when shopping with me. Please do not hesitate to ask me a question as I am here to help you.
Hello there. I have a little “functional” project for you today. I know we all have been experimenting with the Brusho Crystal Colour powders and if you are like most of us, we have put push pins in the top of our Brusho pots. Now the wee pots don’t fit nicely back into the box they came and because of that our crafty space looks unsightly with little pots everywhere. Let’s make a box together to keep those Brusho’s all safe shall we? That’s the project for today and I hope yours turns out as super cool as mine did. Check it out.
Above is button to the entire online store. Below are the links to what I have used on today’s project. Please click on the picture to be taken to the online store. If you make a purchase after clicking on my link, I receive a small commission as your demonstrator with no extra cost to you. I truly appreciate your support when shopping with me. Please do not hesitate to ask me a question as I am here to help you.
Hello again. It’s Friday and I promised you a part 2 to the project I made last week. The Card holder folders actually fit inside a bigger holder. Say that 3 times. Ha. Check out the project for today.
Above is button to the entire online store. Below are the links to what I have used on today’s project. Please click on the picture to be taken to the online store. If you make a purchase after clicking on my link, I receive a small commission as your demonstrator with no extra cost to you. I truly appreciate your support when shopping with me. Please do not hesitate to ask me a question as I am here to help you.
Hello and how are you? It’s the first Friday of the year and I have a tradition here at SuNN Stampin’. Every year I create a card holder box. If you want to see all of them you can click on this play list and it will give you selection of them. So this year I have decided to do something similar but with a twist. Ha. I’m always mixing it up don’t you know? So here is the project for this year and today, however there is a part 2 which will be aired next Friday. It’s kinda a 2 part project. Hope you like it.
Above is button to the entire online store. Below are the links to what I have used on today’s project. Please click on the picture to be taken to the online store. If you make a purchase after clicking on my link, I receive a small commission as your demonstrator with no extra cost to you. I truly appreciate your support when shopping with me. Please do not hesitate to ask me a question as I am here to help you.
OMG, how cute is this project? I can’t even hold my excitement back about this fun fun fun paper. You can get yours on Jan 3 but I got to play early with this super cute paper…and look what I made. 🙂
Above is button to the entire online store. Below are the links to what I have used on today’s project. Please click on the picture to be taken to the online store. If you make a purchase after clicking on my link, I receive a small commission as your demonstrator with no extra cost to you. I truly appreciate your support when shopping with me. Please do not hesitate to ask me a question as I am here to help you.
It’s only a few days from Christmas and I am still enjoying non-holiday projects. I hope you don’t mind. This is a cute box that I came up with (design you haven’t seen before but I am sure you have seen the build). I hope you like it, check it out.
Below are the links to what I have used on today’s project. Please click on the picture to be taken to the online store. If you make a purchase after clicking on my link, I receive a small commission as your demonstrator with no extra cost to you. I truly appreciate your support when shopping with me. Please do not hesitate to ask me a question as I am here to help you.
Hello there. I thank you for stopping by today. I have a project to share with you today…a how to video really. Recently, I was invited to a wedding and had to make a quick box to hold my gift. I thought I would share with you the process of how I go about custom things.
Above is button to the entire online store. Below are the links to what I have used on today’s project. Please click on the picture to be taken to the online store. If you make a purchase after clicking on my link, I receive a small commission as your demonstrator with no extra cost to you. I truly appreciate your support when shopping with me. Please do not hesitate to ask me a question as I am here to help you.
Hello and welcome to today’s project. I have a few really cute projects for you today and it’s not my usual style. These are really specific projects to make for those people in your life that you want to share a crafty gift but not break the bank doing it. I have 3 projects that I am sharing, and these are the treats that I am sharing with the girls at my post office who gather my mail and accept the big brown boxes from UPS for me…they deserve a treat. I also have a few colouring teenagers that would appreciate a crafty gift that keeps on giving. I also like having a few gifts handy just in case a need arises.
So here are the pictures to the projects I am sharing today.
Above is button to the entire online store. Below are the links to what I have used on today’s project. Please click on the picture to be taken to the online store. If you make a purchase after clicking on my link, I receive a small commission as your demonstrator with no extra cost to you. I truly appreciate your support when shopping with me. Please do not hesitate to ask me a question as I am here to help you.
It’s the very last day of my Christmas Crush series. I want to thank you all for watching and I hope you had fun and enjoyed the content. Be sure to pop by Monday to see what I have up my sleeve. 🙂
This project is again, no stamping but a lot of die cutting and boy is it worth it. So super cute! I am sure that anyone would be happy to receive a gift from you in this adorable box. Check it out.
Above is button to the entire online store. Below are the links to what I have used on today’s project. Please click on the picture to be taken to the online store. If you make a purchase after clicking on my link, I receive a small commission as your demonstrator with no extra cost to you. I truly appreciate your support when shopping with me. Please do not hesitate to ask me a question as I am here to help you.
Well TGIF I say. It’s been a long week and I get a 3 day weekend. I decided to take the day off tomorrow to observe Remembrance Day. We have ceremonies in the morning so it I feel it will be nice to pay my respects to those who have protected me in my amazing country. Of course we all will remember and reflect of the sacrifices that were made. I say to anyone who is in service now and who has made sacrifices for me, Thank you. I am humbled.
Today’s project would be an excellent one to give to someone special. A fancy lidded box with a little tip from the Amazing Connie Stewart who thought of an amazing simple tool to help with lidded boxes. Check out the video if you want to know more.
Above is button to the entire online store. Below are the links to what I have used on today’s project. Please click on the picture to be taken to the online store. If you make a purchase after clicking on my link, I receive a small commission as your demonstrator with no extra cost to you. I truly appreciate your support when shopping with me. Please do not hesitate to ask me a question as I am here to help you.
Project day!!!! I have a super cute project to share with you today. I hope you like it.
Above is button to the entire online store. Below are the links to what I have used on today’s project. Please click on the picture to be taken to the online store. If you make a purchase after clicking on my link, I receive a small commission as your demonstrator with no extra cost to you. I truly appreciate your support when shopping with me. Please do not hesitate to ask me a question as I am here to help you.
Hi there. TGIF!!! I have a really cute box to share with you today. I am using my amazing new Specialty Designer Series Paper again. I seriously can’t get enough of this stuff. When I was editing the video I thought to myself that for the embellishment (bow) I could have used the new Year of Cheer Washi tape instead of the little strip of foil I used. You will see in the video but I wanted to state it here that there could be an alternative. Have you seen the new washi tapes yet? They are glorious and I highly recommend that you grab some before they retire at the end of December. I know, we all have too much washi tape but seriously…this stuff is beautiful.
I have been including a shopping link every post during this series because I have had a few people have trouble searching for my name in the online store. I hope that by placing a one stop shopping button front and center that it helps a few people with their trouble. Did you know that the online store is open 24/7? Yep, you can shop in your pajamas if you want. Click the button below to head to the online store.
Here is the project for today. I hope you give this one a try…it was a seriously quick project.
Here are the links to what I have used on today’s project. Please click on the picture to be taken to the online store. If you make a purchase after clicking on my link, I receive a small commission as your demonstrator with no extra cost to you. I truly appreciate your support when shopping with me. Please do not hesitate to ask me a question as I am here to help you.
It’s Friday!!!! The weekend is almost here and I so hope that you are getting your craft on. Here is a really cute project for all those great cookies and little gifties that you will inevitably make/buy for your loved ones.
Remember, if you need to browse the store click the button below but if you need more specific links, remember the product picture links before the video will take you right to the item if you want more information.
Here are the links to what I have used on today’s project. Please click on the picture to be taken to the online store. If you make a purchase after clicking on my link, I receive a small commission as your demonstrator with no extra cost to you. I truly appreciate your support when shopping with me. Please do not hesitate to ask me a question as I am here to help you.
Hi there. I hope you had a great week. I have a really cute treat holder for you today. I hope you like it. Check it out.
Here are the links to what I have used on today’s project. Please click on the picture or wording to be taken to the online store. If you make a purchase after clicking on my link, I receive a small commission as your demonstrator with no extra cost to you. I truly appreciate your support when shopping with me. Please do not hesitate to ask me a question as I am here to help you.
Hello there. It’s Friday and that means another 3D project for you. This one is a gooder! Hope you like it. Check it out.
Here are the links to what I have used on today’s project. Please click on the picture or wording to be taken to the online store. If you make a purchase after clicking on my link, I receive a small commission as your demonstrator with no extra cost to you. I truly appreciate your support when shopping with me. Please do not hesitate to ask me a question as I am here to help you.
The Details:
Cardstock sizing for Box: 8″ x 3 3/4″
Long side scoring: 1 1/8″, 3 3/4″, 4 7/8″ and 7 1/2″.
Short side scoring: 3/4″
Patterned Paper sizing: (front and back) 2 3/8″ x 1 3/4″.
Cardstock sizing for Lid: 4 5/8″ x 3 1/4″
Scoring: score on all sides at 1″.
Patterned Paper sizing: Top: 1″ x 2 3/8″. Front & Back 2 3/8″ 1 3/4″


 Shimmer Ribbon Pack")


 Designer Series Paper")


 Solid Ribbon")


 Metallic-Edge Ribbon")