Ok, I have the perfect little box for Ikea tea lights. Finally. I fashioned this box after seeing the boxes I use all the time at the salon. I really like the final result. Hope you enjoy the project too. 🙂
Cardstock sizing: 9 ¾ by 6 1/2
Scoring:
Long side: ½, 1 ¾, 8, 9 1/4
Short side: 1 ¼, 2 7/8, 4 1/8, 5 ¾
Hi there. Happy Saturday to you. I really don’t know where the original post for this video went…I noticed that it was not aired and I am really sorry that happened. This little project is for those of you who are giving DVD’s or things that are shaped like DVD’s (like our clear mounted or photo polymer stamp sets) for a gift. One of the nice things about this project is that it uses the envelope punch board. It’s not just for envelopes you know. 😉
Enjoy the show.
Card Stock: 10 3/4 by 10 3/4
Line up at 4 1/2, punch and score then slide to 5 -punch and score.
Rotate 180 degrees and repeat step 1.
Flip over, line up at 4 1/2, punch and score then slide to 5 -punch and score.
Rotate 180 degrees, line up at 4 1/2, punch and score then slide to 5 -punch and score.
Line up score lines to the dial and score (no need to punch as it should already be done).
Round all corners.
Cut 2 bottom squares to be tabs.
Cut away 2 top tabs.
Place DVD sized object in package, secure the flaps with adhesive.
Optional, cut a slit for the open flap to be inserted.
What’s an artist trading card you may ask? Artist trading cards (or ATCs) are miniature works of art about the same size as modern trading cards baseball cards, or 2 1⁄2 by 3 1⁄2 inches, small enough to fit inside standard card-collector pockets, sleeves or sheets. Cards are produced in various media, including dry media (pencils, pens, markers, etc.), wet media (watercolor, acrylic paints, etc.), paper media (in the form of collage, paper cuts, found objects, etc.) or even metals or fiber. The cards are usually traded or exchanged and never sold.
So, I have made several boxes in the past to hold some of mine and I thought that I would share with you on how I made them. I hope you enjoy this little project. 🙂 Feel free to share with me the artist trading cards that you have made. I’d love to see them.
PS. Happy Halloween!
Enjoy the show.
Cardstock Sizing:
Lid: 4 13/16 by 5 13/16
Box: 6 ¾ by 7 3/4
Decorative Paper Sizing:
Lid:
First layer (card stock) 2 ¾ by 3 ¾
Second Layer (card stock) 2 ½ by 3 ½
Third Layer (designer series paper) 2 ¼ by 3 ¼
Sides:
Long side (2) 3 5/8 by 7/8
Short side (2) 2 5/8 by 7/8
Scoring:
Lid: 1 inch on all sides
Body: 2 inches on all sides
Notes: Especially made for artist trading cards sized at 2 12/ by 3 ½
This project was inspired by the old school paper bags that we once received from the grocery stores oh so long ago. I like the idea that you can make a bunch of them ahead of time and store them flat so that you can grab them when you need them. I have a box full of boxes right now from past Friday videos, I wish I had more space! Anyway, gotta love this great new paper, just adds to a wonderful sack of goodies inside.
Enjoy the show…
DSP or card stock sizing: 12 by 6
Scoring:
Short side: 1 ½
Long Side: 2, 3, 4 and again at 7 3/4, 8 3/4, 9 3/4
Product List
This booklet was specifically made for the “Simply Sentiments English Ivy Stationary Set” that is in the clearance section in the online store. The basic principles will be the same for any stationary set. What a pretty gift for someone who likes to write letters.
Cover Cardstock sizing: 12 by 8 ½
Scoring: Long side: 5 ¾ by 6 ¼
DSP:
First Layer: 5 ½ by 8 ¼
Second Layer: 5 ¼ by 8
Letter band and Envelope band
Cardstock sizing (2): 8 ¼ by 2 ½
Scoring:
Long side: 1, 1 3/8, 6 7/8, 7 ¼
Short side: 1 5/8, 2
DSP: 5 3/8 by 1 3/8
So this project is basically a domed envelope that one could slide their cutlery or napkin into for your fancy family dinner setting. I thought the Color me Autumn designer series paper was perfect for this project but I can see some of the new beautiful Christmas paper would be really nice for say a Fancy Christmas table setting.
Cardstock sizing: 6 by 6
Scoring: Line up at the 2 inch mark, punch and score.
Turn counter clock wise, line up the dial to the score line (corner should match up to the 4 inch mark) punch and score. Turn counter clock wise, line up the dial to the score line (corner should match up to the 2 inch mark) punch and score. Turn counter clock wise the last time, line up the dial to the score line AND PUNCH ONLY…DO NOT SCORE!
Round all corners, fold all (3) score lines. Use craft blade to cut slit in the score line so the right side corner will slip into it and create a dome. Fold the bottom flap up and secure. Fold the left side over all and secure with adhesive.
No cutting, little or no adhesive…it sounds a lot like origami to me. Not every bag has the ability to adjust for each thing it carries but this bag kinda does. I demonstrate in the video here. I used a small box of chocolates and adjusted the scoring lines around the chocolates. I hope my instructions will help even if you are as bad at arithmetic as I am. Ugh!!!
Enjoy the show.
No cutting, just scoring on this one. Scoring depends on items to be put inside.
Measure item to be packaged, center item in the middle of the paper selected (short side on your score board) score on the left and right side of the item with an even amount on each side.
Measure the item long ways on the long side of the paper selected. Score on the left and right side of the item with an even amount on each side.
Fold and score on all lines.
Friday is here again and I have another quick video to share with you. This time it’s a sweet little box that has a drawer that pulls out. I think it is very similar to a match stick box but it’s a lot bigger than that.
Enjoy the Show.
Drawer Cardstock: 5 ½ by 3 ½
Score ¾ inch on all sides
Note: punch before adhering with small oval punch
Cover Cardstock: 6 3/8 by 4
Scoring on long side only: 3/8, 2 1/2, 3 3/8 and 5 ½
DSP:
First layer (card stock): 3 ¾ by 1 7/8
Second Layer (dsp): 3 ½ by 1 5/8
Inside drawer: 1 7/8 by 3 7/8
Every now and again, I get asked to create a specific box or container to house a gift or in this case 12 things that are the same. I cannot share what goes in here as it is a gift for a friend and (he or she) may glance a look at this video. So, anyway, this was a super fun albeit long project and I am really pleased that it worked out perfectly.
Enjoy the show.
Cardstock Sizing:
7 ¼ by 8 ¼
Decorative Paper Sizing:
Sides: 4 by 1 ½
Lid: 1 ½ by 1 ½
Scoring:
Long Side: 1 ¾, 6. 7 ¾
Short Side: ¼, 2, 3 ¾ 5 1/2
Product List
Often times, when I have extra crafting supplies, retired items or just extra things I like to share the wealth. I have never been one to hoard and being a frugal crafter myself I would have appreciated it if someone gave me a few things here and there. This is one of those projects where I have had a use for it and decided to share. So if you are a customer of mine and have received such package, this is how I made it. This thin box will store exactly 3 Stampin’ write markers.
Enjoy the Show.
Cardstock Sizing:
8 by 4 ½
Scoring:
Long side: ½, 7 ½
Short Side: 1/2, 2, 2 ½, 4
It’s Friday video and I wanted to share a way to spruce up dollar store note books. As we all like to save a penny or two, I also like aesthetically pleasing things too. This is how you can wrap your notebook and fancy it up for your desk. This would be a great project for anyone who wanted to make a lot of something but was on a tight budget.
Enjoy the show.
Notebook Covering Box
To make this Project:
Long Notebook Cardstock Sizing: 3 ½ by 10
DSP: 6 ¾ by 1 ¼, Cardstock matting: 3 by 3, Whisper White: 2 ¾ by 2 ¾
Short Notebook card stock sizing: 4 by 8 ½
DSP: 3 ¾ by 5 ¼, Cardstock matting: 3 by 3, Whisper White: 2 ¾ by 2 3/4
Product List
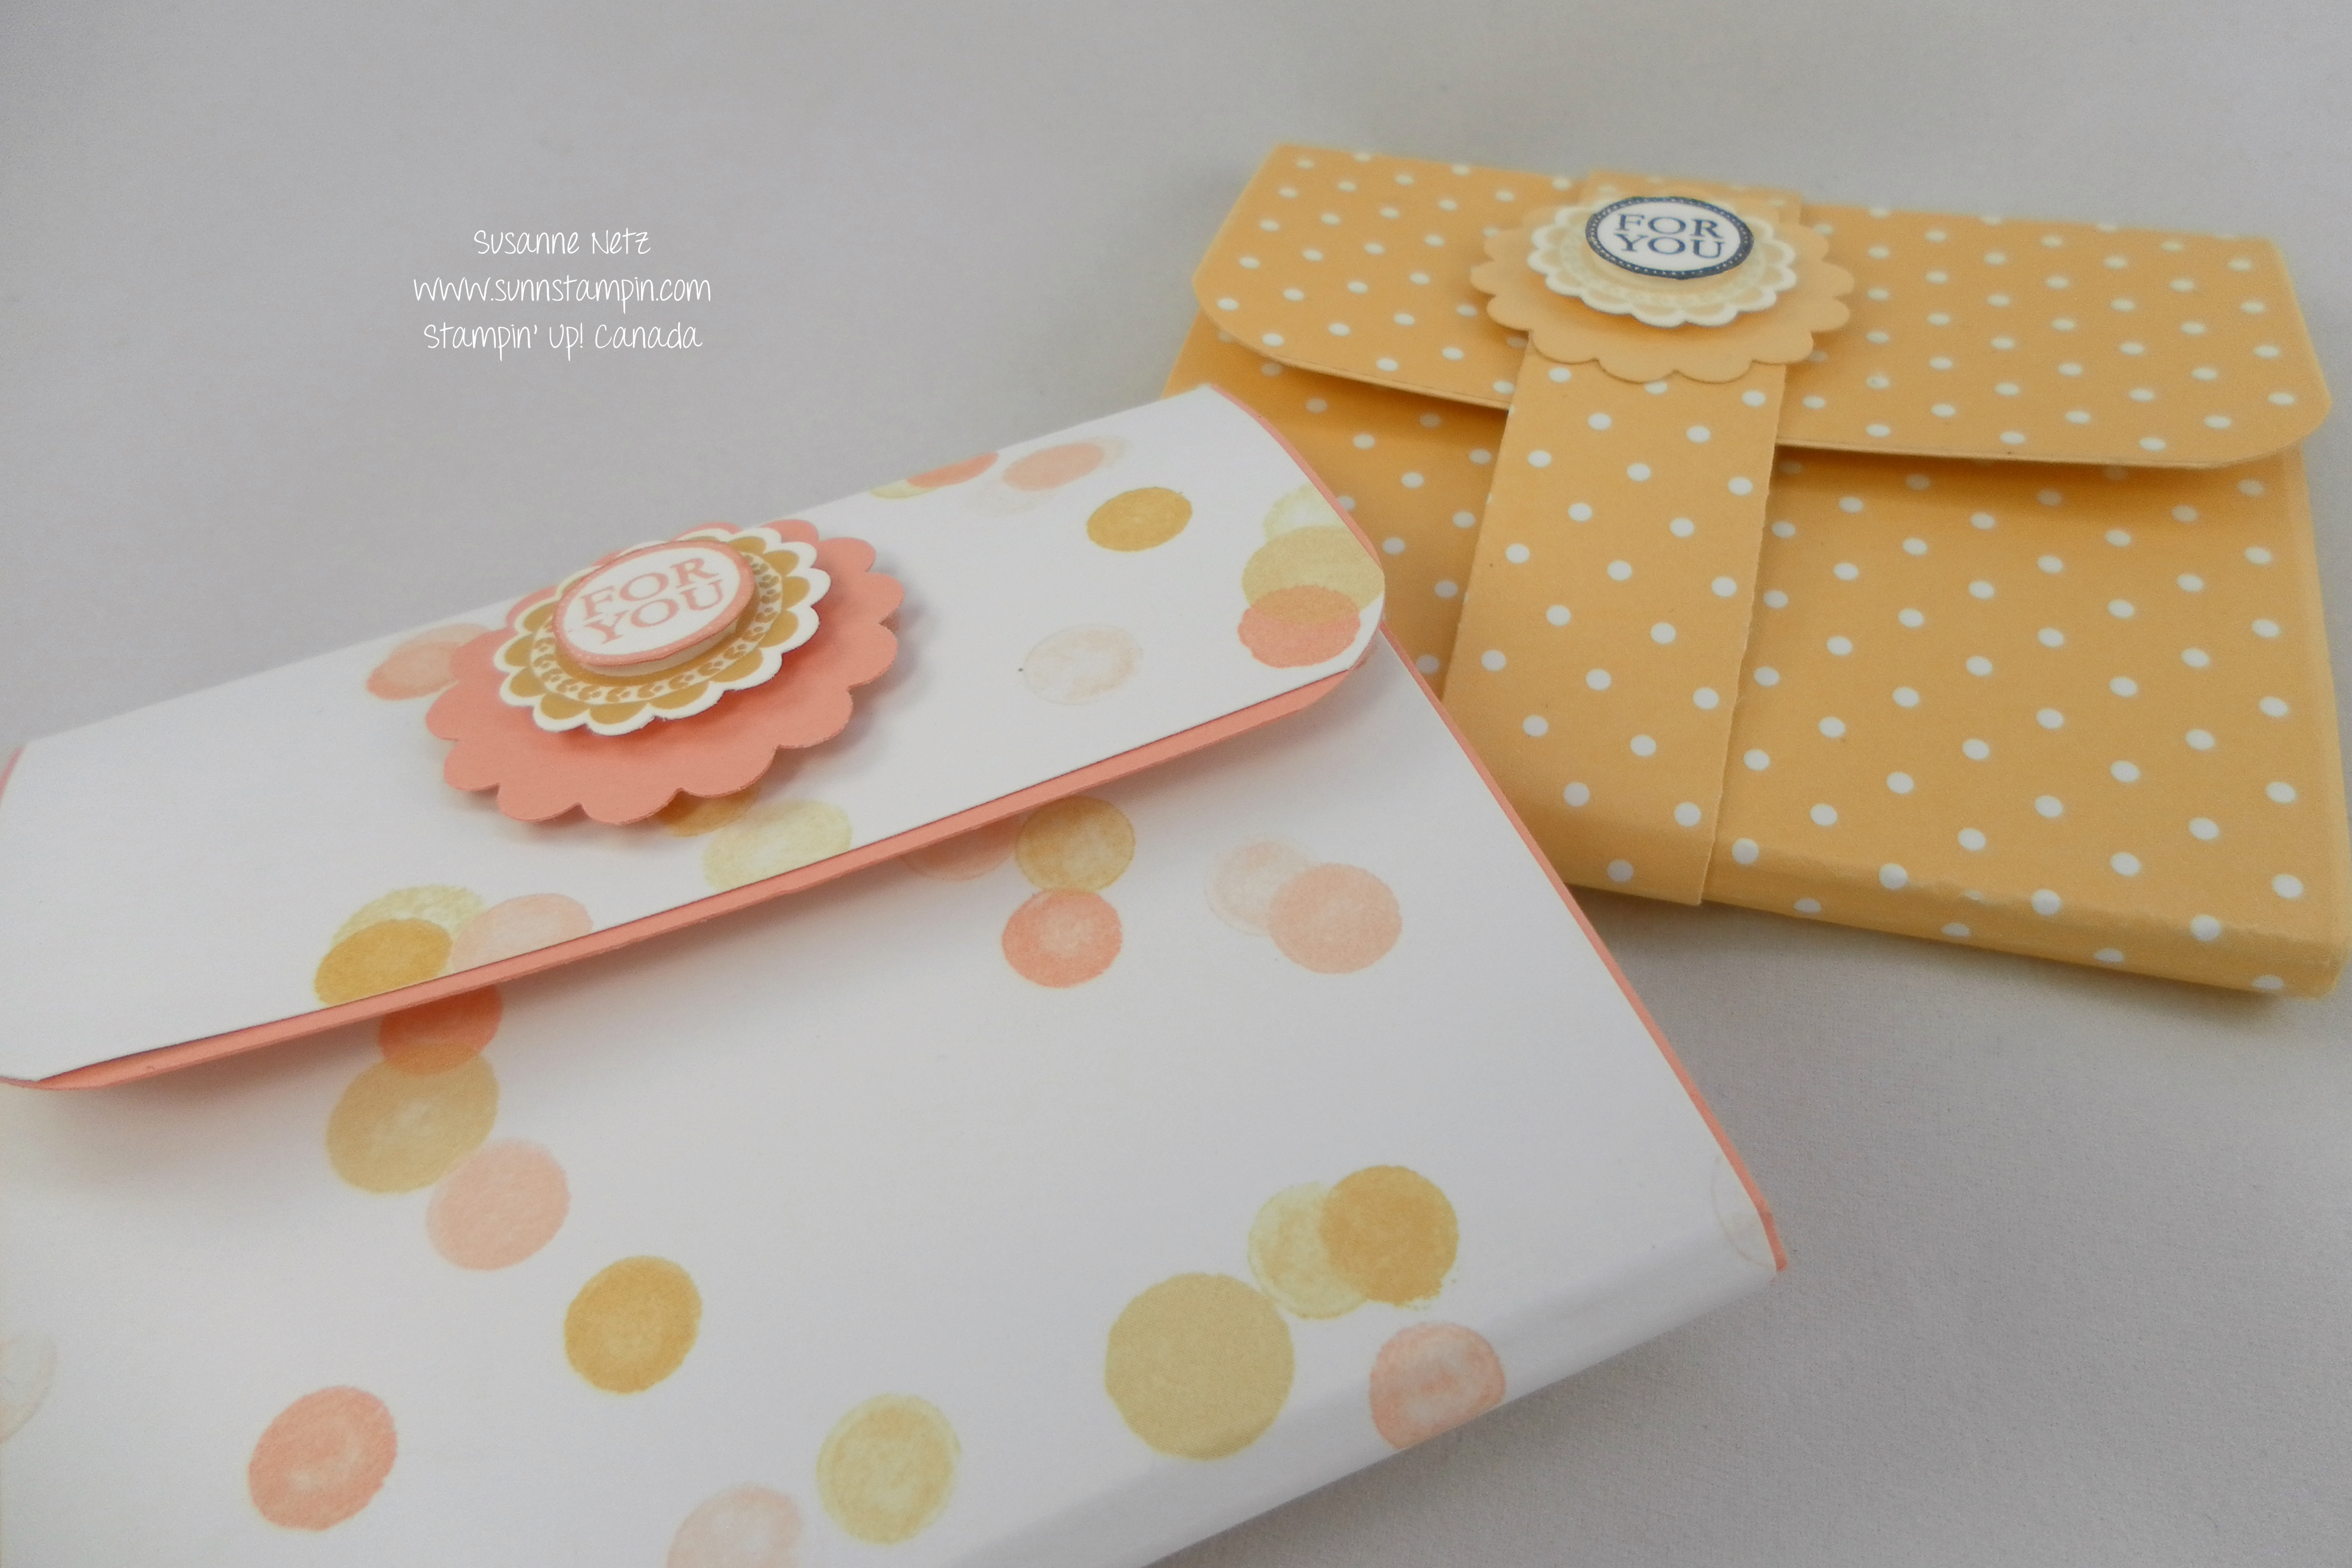
I’m always looking for unique ways to wrap gift cards other than the usual boring way we hand them out. I can see this little pocket to put other things into as well, perhaps a tea bag, hot cocoa packet, maybe cash or coin….the list is growing. Are you starting to think of Christmas yet? Me too. Better book mark this page so you can refer back to it when you need a way to wrap those stocking stuffers.
Enjoy the show.
To make this Project:
Supplies:
Card stock: 8 2/8 by 3 ½
DSP: 8 1/8 by 3 3/8
NOTE: Adhere DSP to Cardstock first before you score.
Scoring: On the long side only (4 lines together) starting at 2 7/8, 3, 3 1/8 and 3 2/8 then again at 6 1/8, 6 2/8, 6 3/8 and 6 4/8.
Accordion folded card stock sides: 2 pieces 2 ¾ by 3
On the long side score at increments of 3/8 all the way along on the way.
This is a unique build using a very small piece of paper and my very last bit of the key DSP that I got on clearance ages ago. I just love it. I am so glad I made little boxes and things so I could enjoy the paper every day! I don’t even think I made a card with it. I totally hogged it all to myself. Ha!
Enjoy the show.
To make this Project:
Supplies:
Card Stock: 4 ½ by 6 ½ inches
DSP: 1 piece of 2 by 2 ¼ inches for lid
2 pieces of ½ by 2 ¼ inches for front and back
2 pieces of 2 by ½ inch for sides
Scoring:
Short Side score at ¼, 1, 3 1/2 , and 4 2/8.
Long side scored at ¾, 3, 3 ¾ and 6.
Sometimes it’s nice to give more than a card and this is the perfect way to offer an inexpensive gift to someone special. How cute is this paper craft? I love how versatile paper is and how with just a little bit of effort how extraordinary a little something can be. I hope you like this project as much as I did making it. I think this would be a great gift for my clients this year!
Enjoy the show.
To make this Project:
Supplies:
Cardstock: 3 ½ by 7 ½
DSP:
Front Flap: 7/8 by 3 ¼
Back Piece: 2 ¾ by 3 ¼
Front Piece: 2 ¾ by 3 ¼
Scoring:
Long side at 3, 3 ¼, 6 ¼ and 6 ½.
Inside band:
Card stock: 1 ½ by 4
Scored on the long side at: ¼, 3/8, 3 5/8 and 3 6/8 inches.
DSP for inside band: 1 ¼ by 2 ¾ inches.
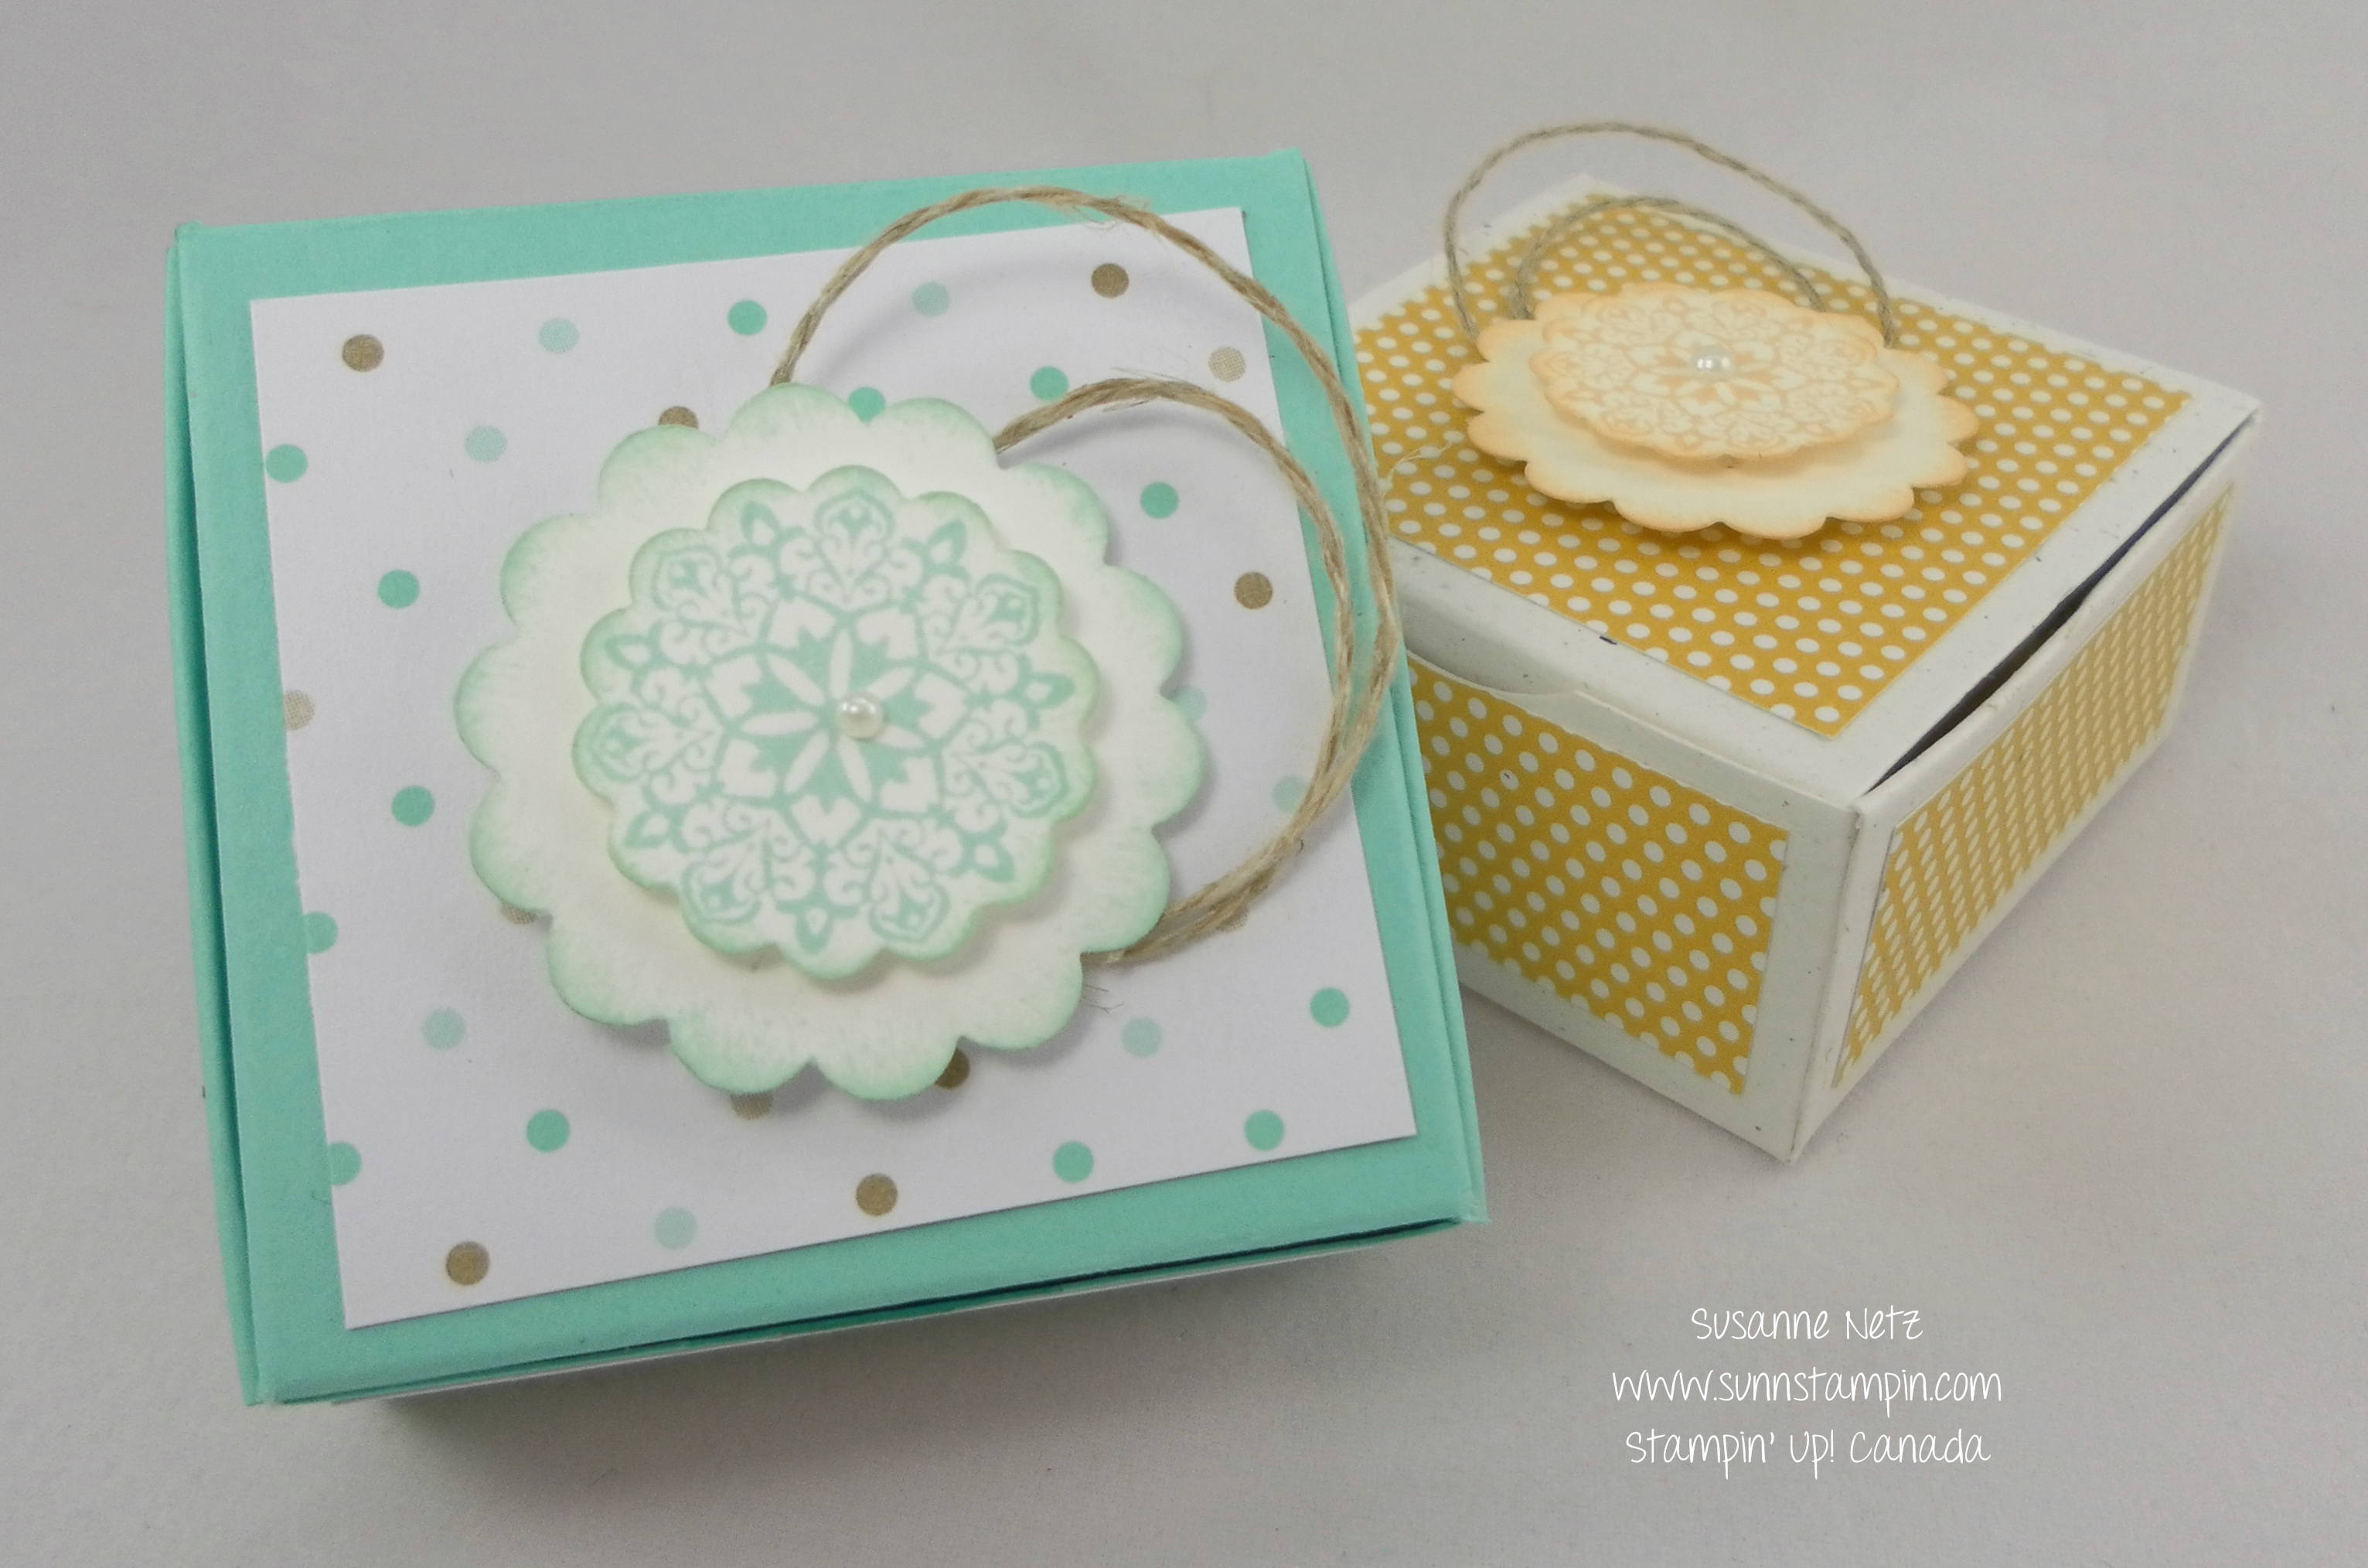
Sometimes when first time customers order with me I like to give them a little thank you. It could be anything Stampin’ Up! related and these super cute boxes are just the ticket for stamp spots. I get them with my paper pumpkin subscription and if it’s a color that I already have I give it away (I can’t bear to see those little colorful ink squares dry up and die). So ya, I share the love!
Enjoy the show.
To make this Project:
Supplies:
Cardstock; 4 ½ by 6 ½
DSP:
Lid: 1 ¾ by 1 ¾ inches
4 pieces for sides sized 1 ¾ by ¾ of an inch
Scoring:
Short side: ¼, 1 ¼, 3 ¼ and 4 ¼ inches
Long side: 1, 3, 4, and 6 inches
Surprise!!! It’s not a box tutorial today. 🙂 It’s a bit of a paper craft but it’s still really neat. I had the prototype sitting on my desk for a while but I had to get through all my boxes first before I could bring this one on. I hope you enjoy something a little different.
Enjoy the show.
To make this Project:
Supplies:
Card stock (optional): 4 3/8 by 7 1/8 inches
Scored at 3 ¼ and 4
DSP Cover 7 ¾ by 12
Scored on the long side at 2 3/8, 5 5/8, 6 3/8 and 9 5/8 inches
Scored on the short side at 1 ¾ and 6.
I used 20 pieces of card stock sized 3 by 4 inches for the pages. The little piece that bonded the pages together was 3 by ¾ of an inch. I scored it at 1/8, ¼, and ½ inches. I’m sure there is a million ways to do this but I was pleased with this so I went with it. 🙂
Guess what? It’s video Friday and guess what I have for you? It’s a goodie box. Ha ha. I hope you enjoy this little project. I think it’s totally cute!
Enjoy the show!
To make this Project:
Supplies:
Cardstock: 8 ½ by 11
DSP: 2 pieces for front and back sized 3 ½ by 5 ¼ inches
1 piece for lid top sized at 1 ¼ by 5 ¼ inches
Scoring:
Short Side score at 1 ½ and 7 inches
Long Side score at 3 ¾ , 5 2/8, 9 and 10 ½ inches
It’s video Friday again and I am very please to share with you a lovely little box that could easily hold a large piece of home made soap or really anything that you wanted. I love the new papers I used and just really had fun creating them (as you can see I made several). I hope you like this project and will come back next Friday for another Stampin’ Up demonstration tutorial.
Enjoy the show…
To make this Project:
Supplies:
Cardstock: 7 ½ by 8 1/2
Scoring:
Long side: 1 1/8, 3 7/8, 5, 7 3/4 inches
Short side 5/8, 1 ¾, 5 ¾, and 6 7/8 inches
DSP:
2 pieces at 3 ¾ by 2 ½ inches
2 pieces at 7/8 by 3 ¾ inches
2 pieces at 7/8 and 2 5/8 inches
It’s video Friday again and I just have to say this is a pretty cute project that I am sure will get lots of use if you choose to make it. I hope you do! So cute and fun. Don’t you just love the new Moonlight Designer Series Paper? It’s totally my favorite. Love it.
Enjoy the show…
To make this Project:
Supplies:
Cardstock: 11 by 10 1/2
Scoring:
Long side: 1, 3 1/2 , 6 & 8 1/2 inches
Short side 2 ½ and 8 inches
DSP:
3 pieces at 5 ¼ by 2 ¼
1 piece at 2 ¼ by 2 1/4
It’s video Friday and boy do I have a giant sized box for you today. Small boxes are great but it’s also nice to have a larger one every now and again to house larger items. I love how this project turned out (even if the video was working against me this time). I’m still new at this so please bear with me. 🙂
Also I just wanted to remind all my customers that I will be making an order the first week in July so if you have a “want list” you may want to shoot me an email at sunnstampin@gmail.com so I can place it for you. If your merchandise order is less than $100 it’s best to order through me as you will get shipping at a lower rate. If your order is more than $100 then your shipping will be the same as mine so you could order online through Stampin’ Up and get the products sent to your doorstep. I’d like to announce one more thing, Stampin’ Up is having a designer paper deal for the month of July (buy 3 and get one free), you’ll find the selection of papers on page 186 and 187 of the new catalog. Specialty papers or paper stacks do not apply sadly. If you need a catalog please let me know.
Enjoy the show…
To make this Project:
Supplies:
Card stock 12 by 12
Scoring:
Score at 2 7/8, 5 ¾, 8 5/8, and 11 ½ inches
Turn and score at 2 7/8, 8 5/8 and 11 ½ inches
DSP:
4 pieces at 5 ½ by 2 5/8 inches
1 piece at 2 5/8 by 2 5/8
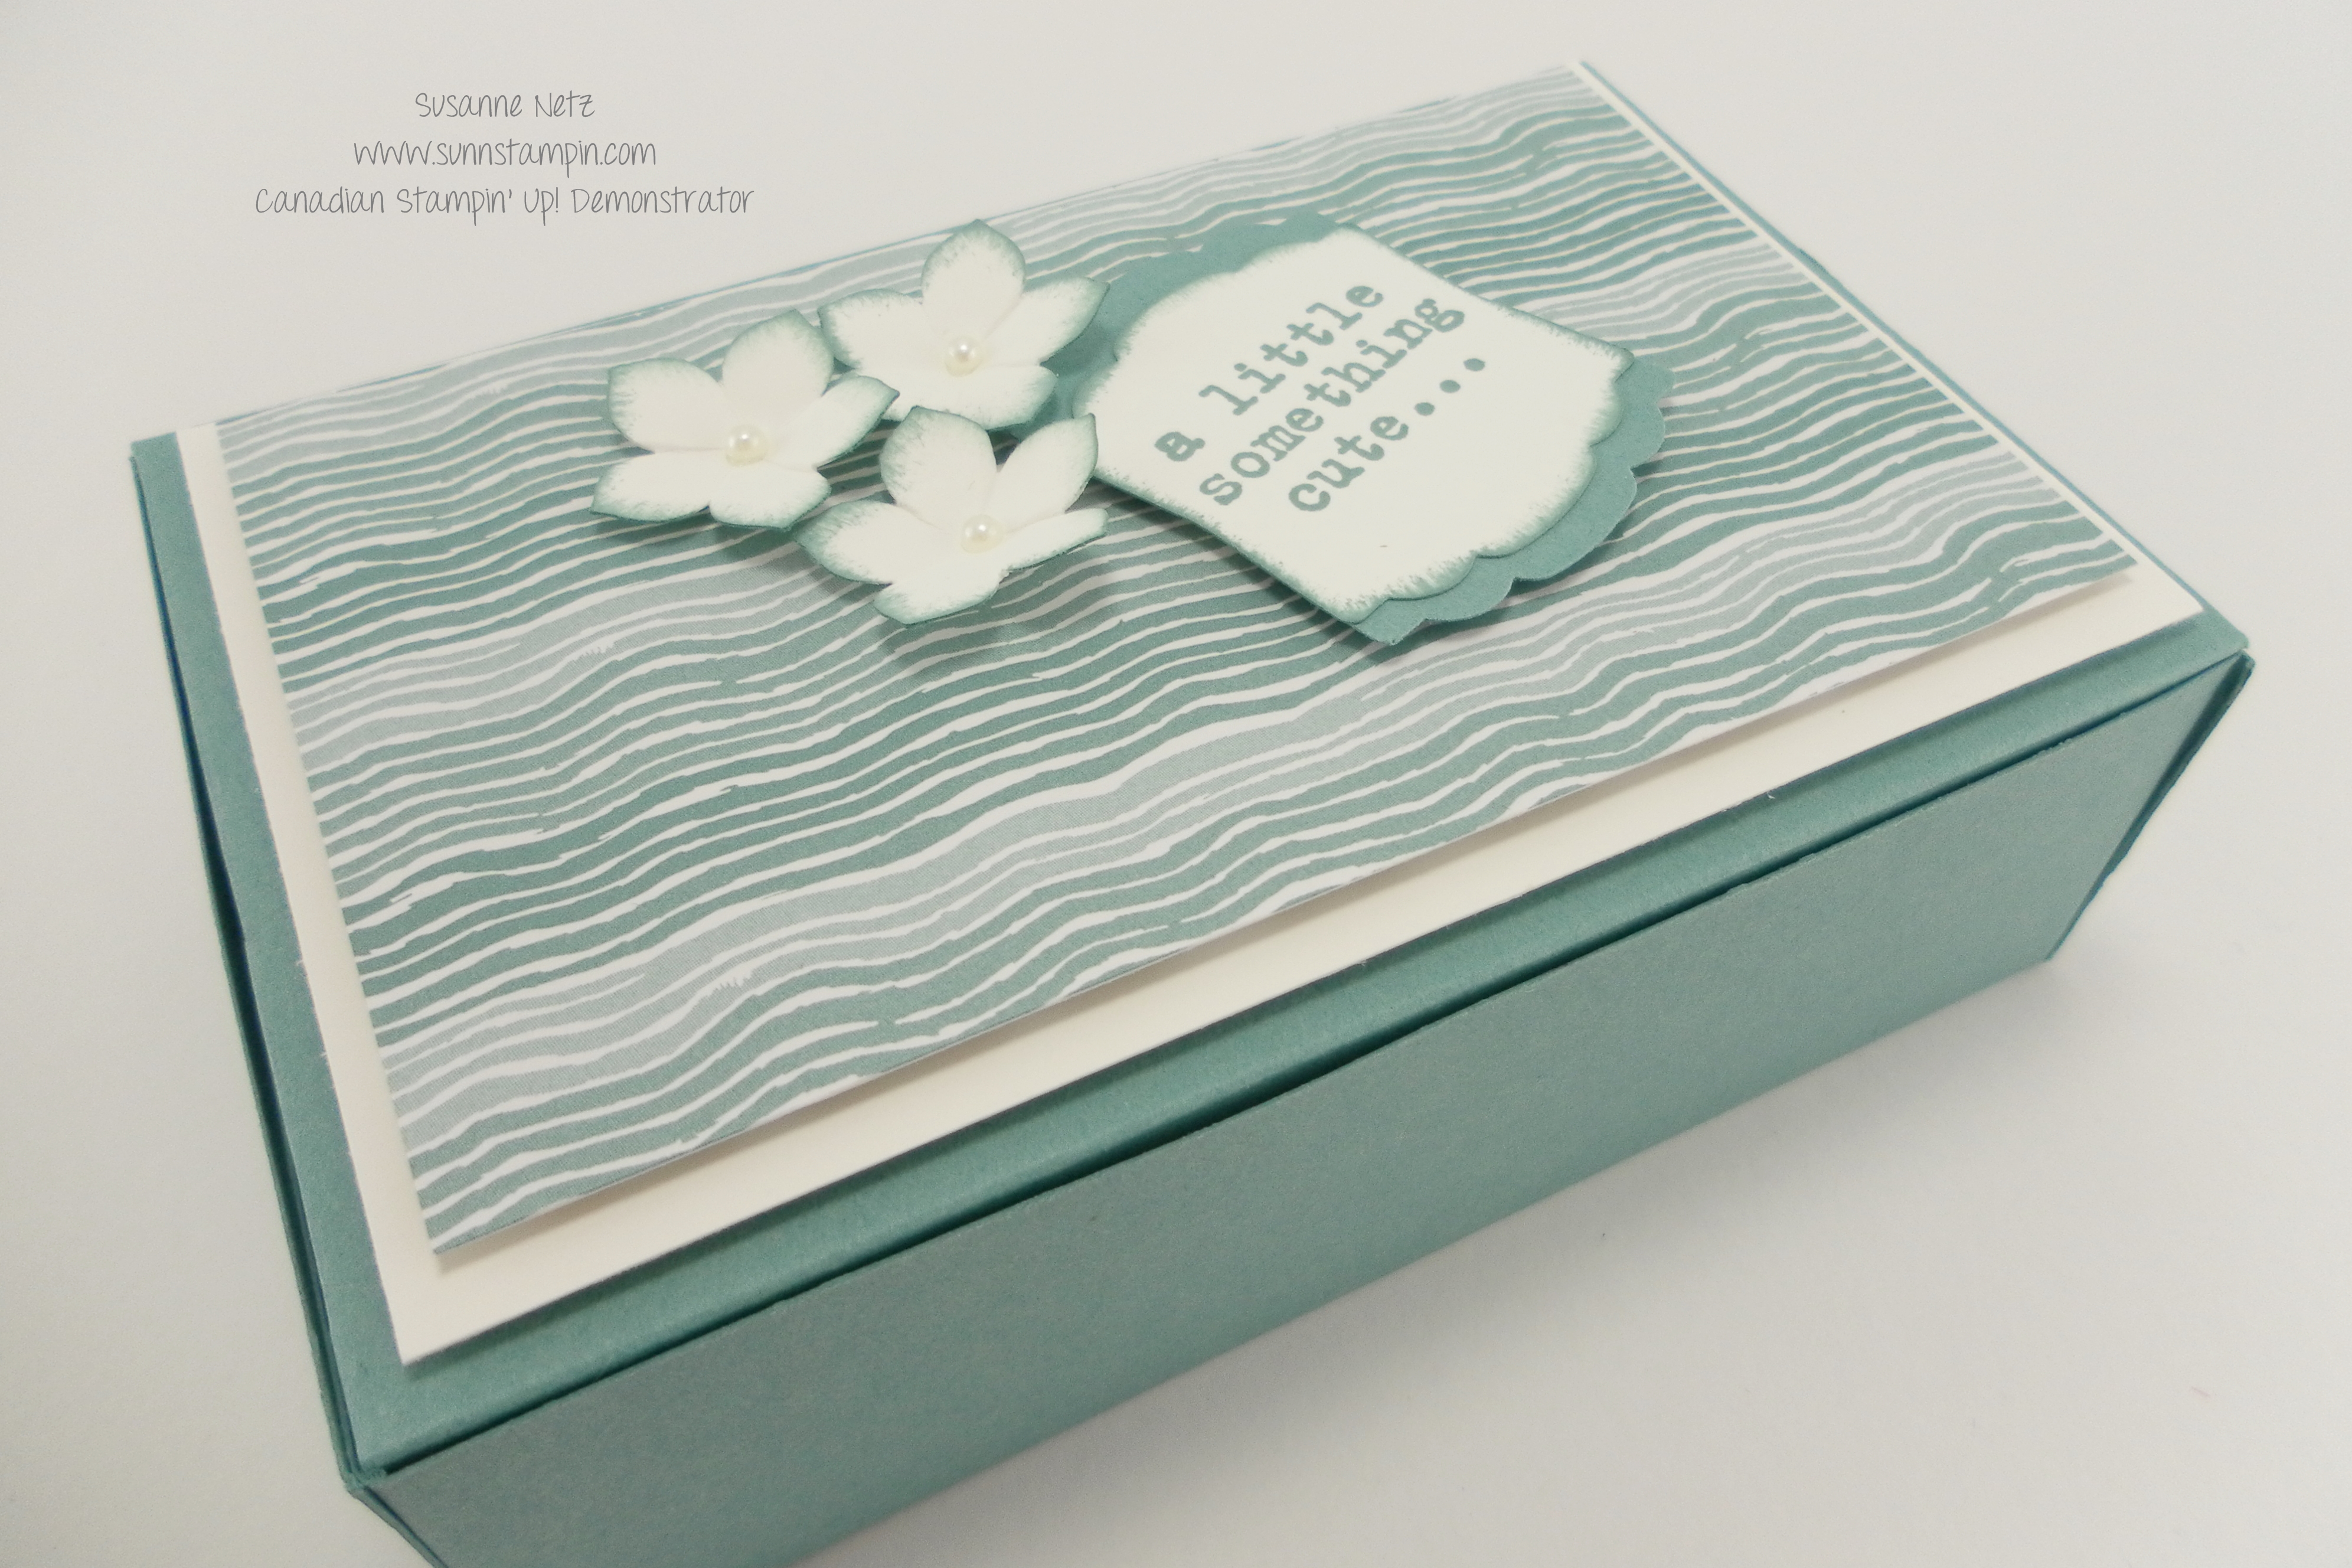
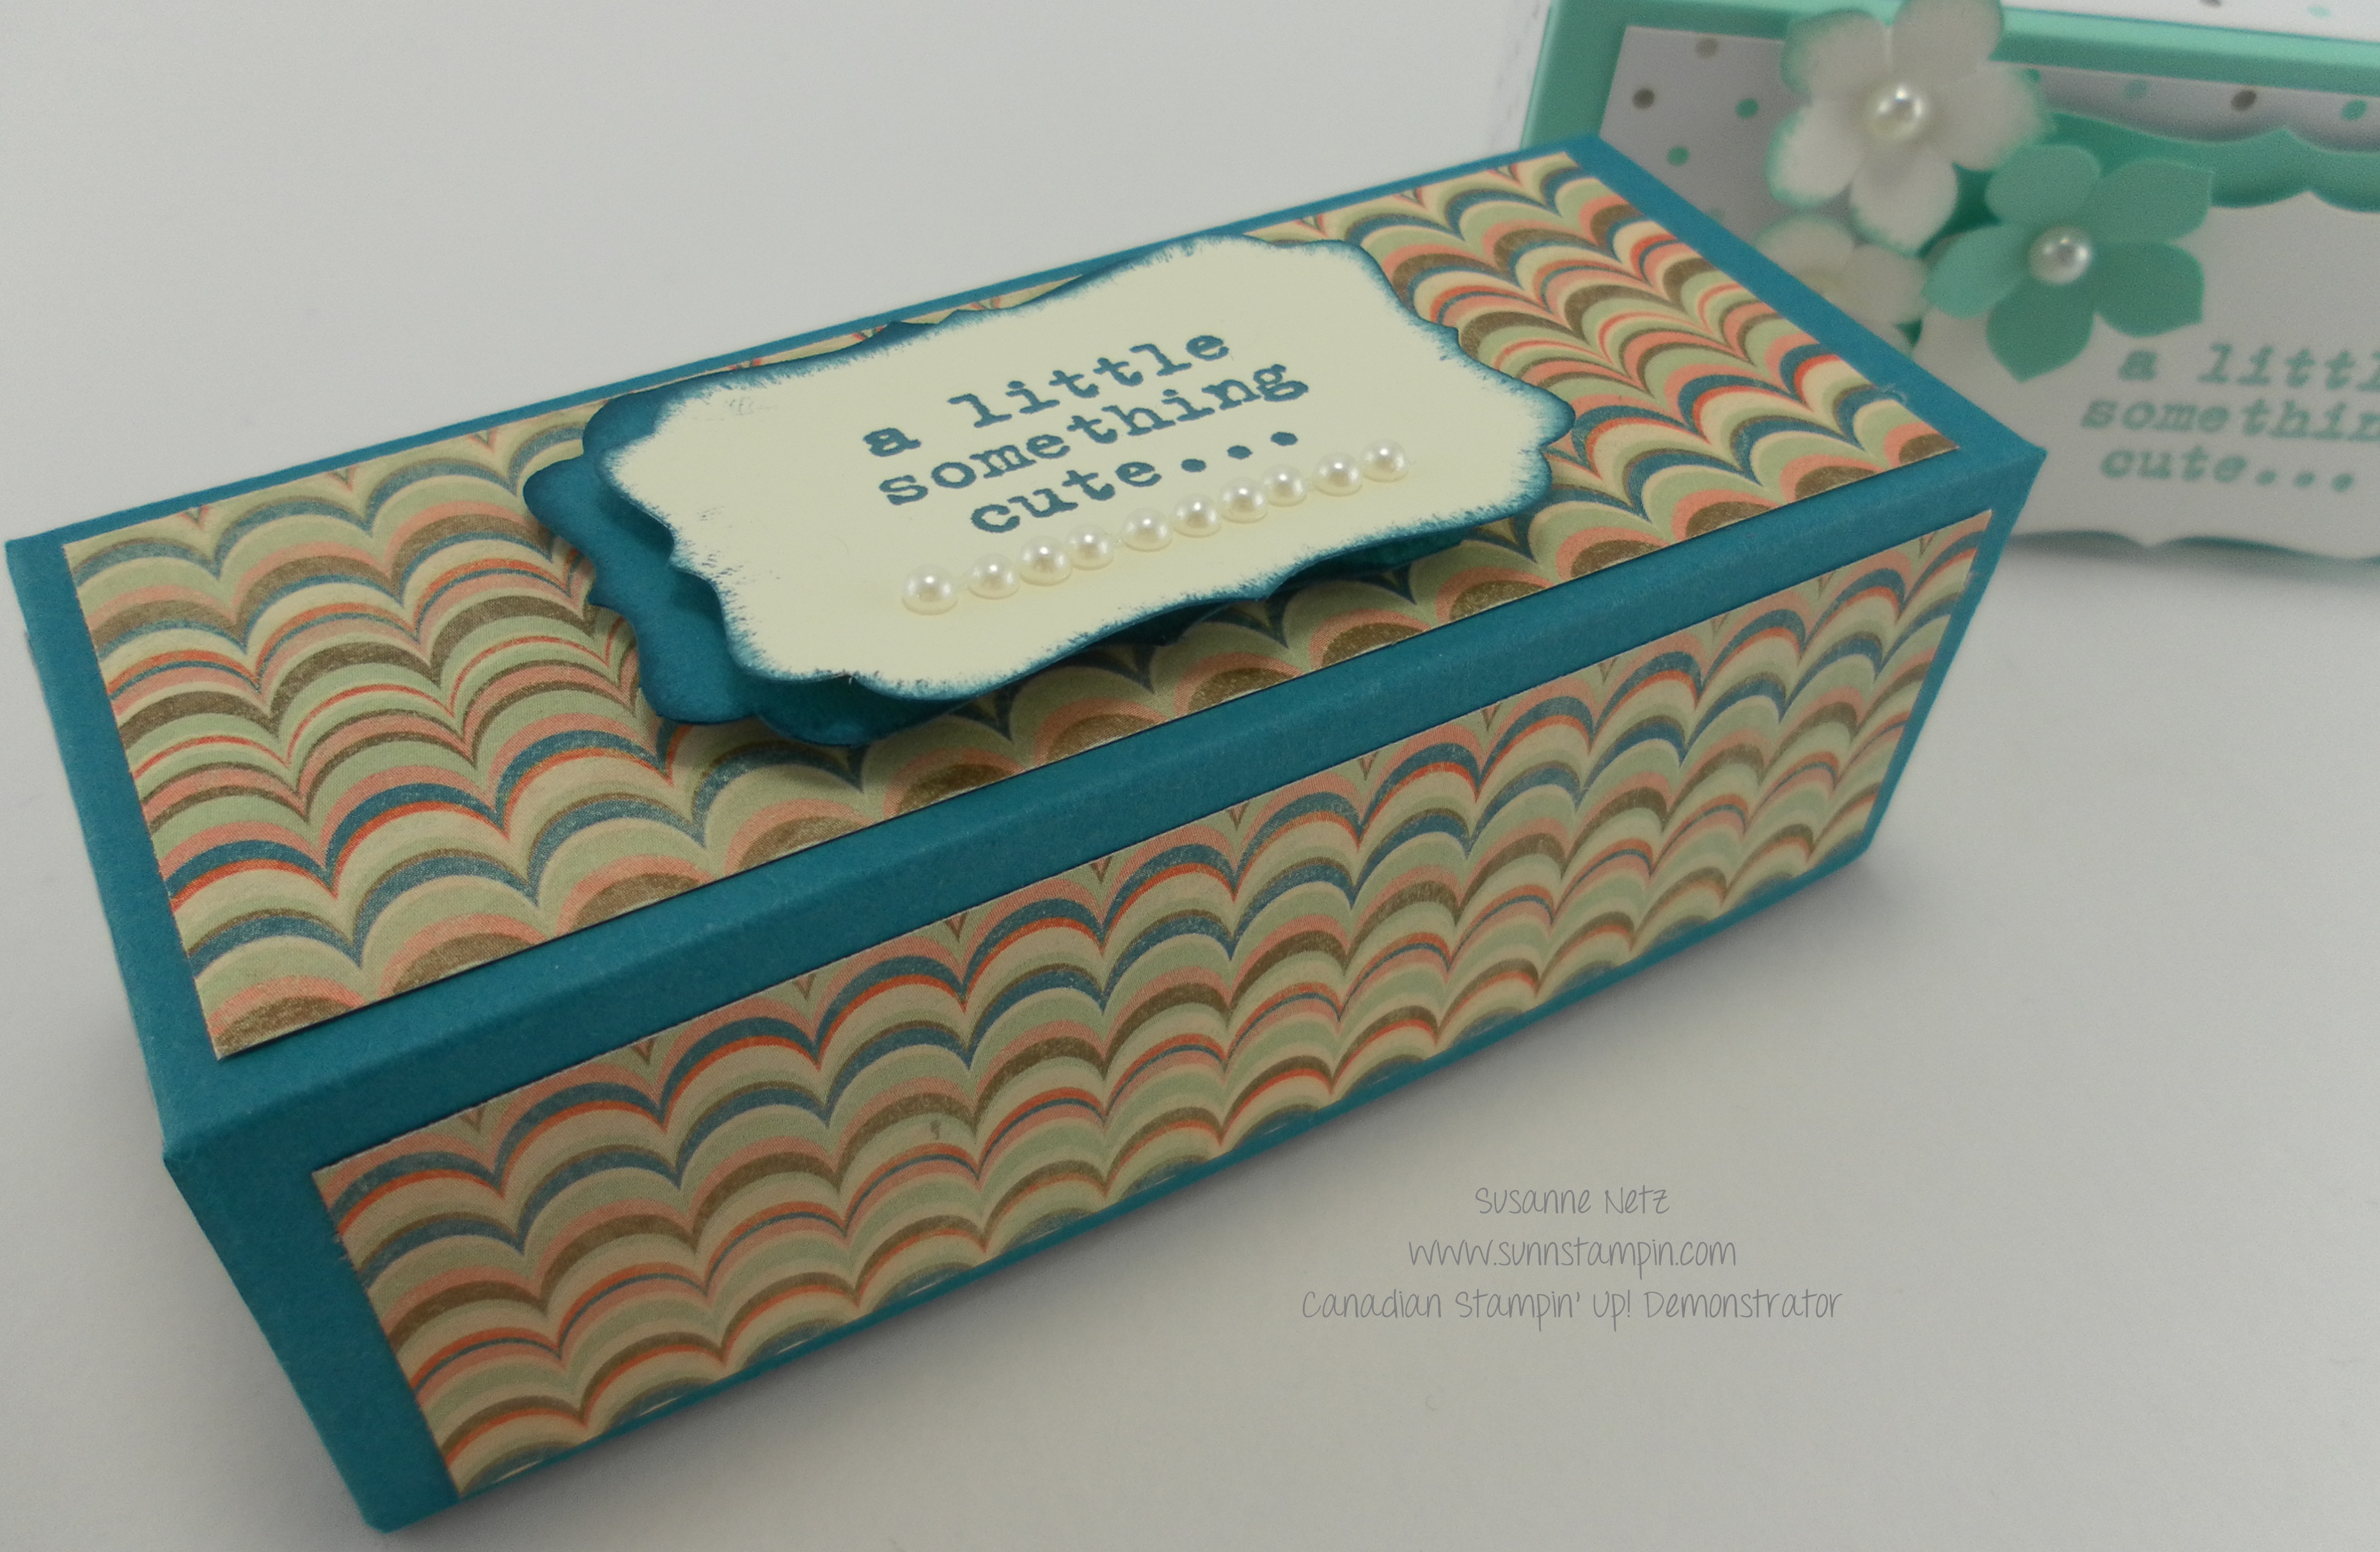
It’s video Friday again and I have another similar sized box that I did yesterday but it’s very different in construction. I really like lidded boxes and although last week I featured a flip lid box, I think I may like this one just a little more. Tell me which one you like best.
4.5 Lidded Box
To make this Project:
Supplies:
Box Lid: 7 9/16 by 4 13/16 inch cardstock
Box: 7.5 by 4 ¾ inch cardstock
DSP :
1 piece of 4 ¼ by 1 5/8 inch dsp for top
2 pieces of 4 ¼ by 1 ¼ inch dsp for front and back
2 pieces of 1 5/8 by 1 ¼ inch dsp for sides
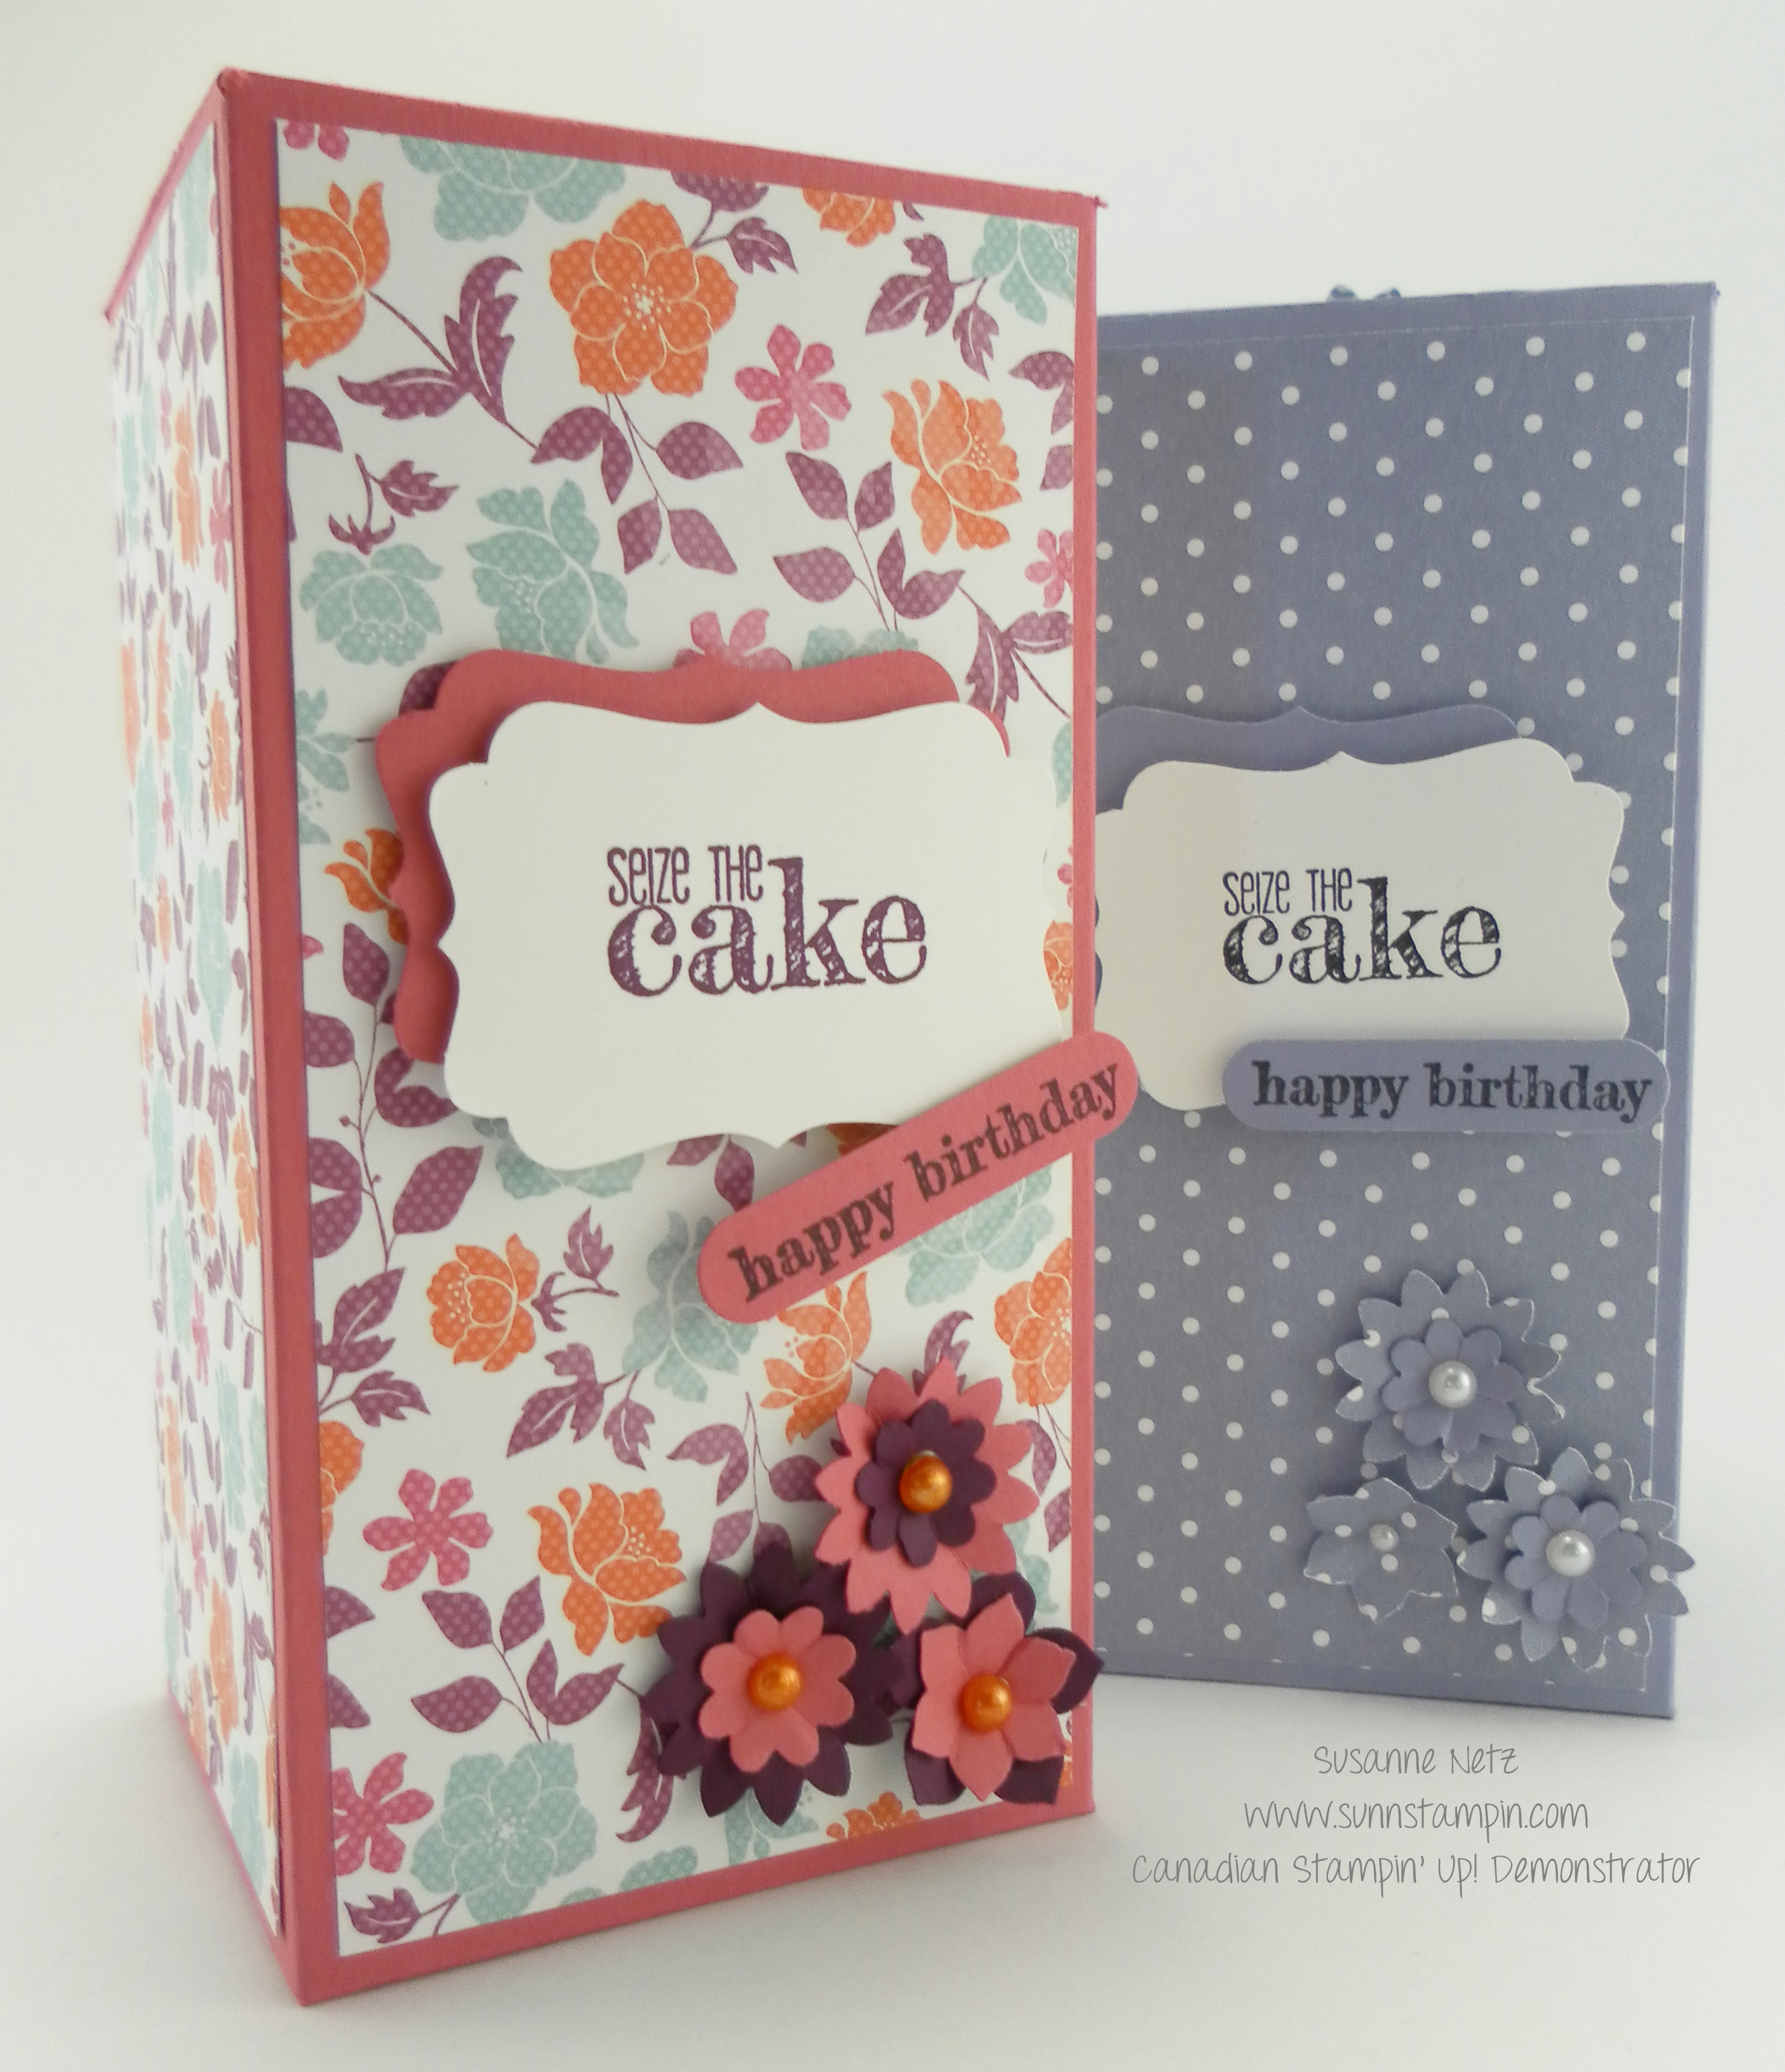
It’s video Friday!!! This little box would be perfect for putting a little treat in for your loved one, or could be easily used for a party favor or to use as a small box for a special birthday present. I quite like the way it turned out. I hope you do too.
Here are the photos and the video is down below.
4.5 inch Rectangle Flip Lid Box
To make this Project:
Supplies:
Cardstock: (if you wanna use dsp instead you can as in the example I showed you. Just disregard the following DSP measurements) 12 by 4 inches
Scoring:
Score on long side: 1, 5 ½, 6 ½ and 11 inches
Score on short side: 1, & 3 inches
DSP:
Top: 4 ½ by 1 ¾
Front and back: 4 ½ by ¾ Sides: 1 ¾ by 3/4
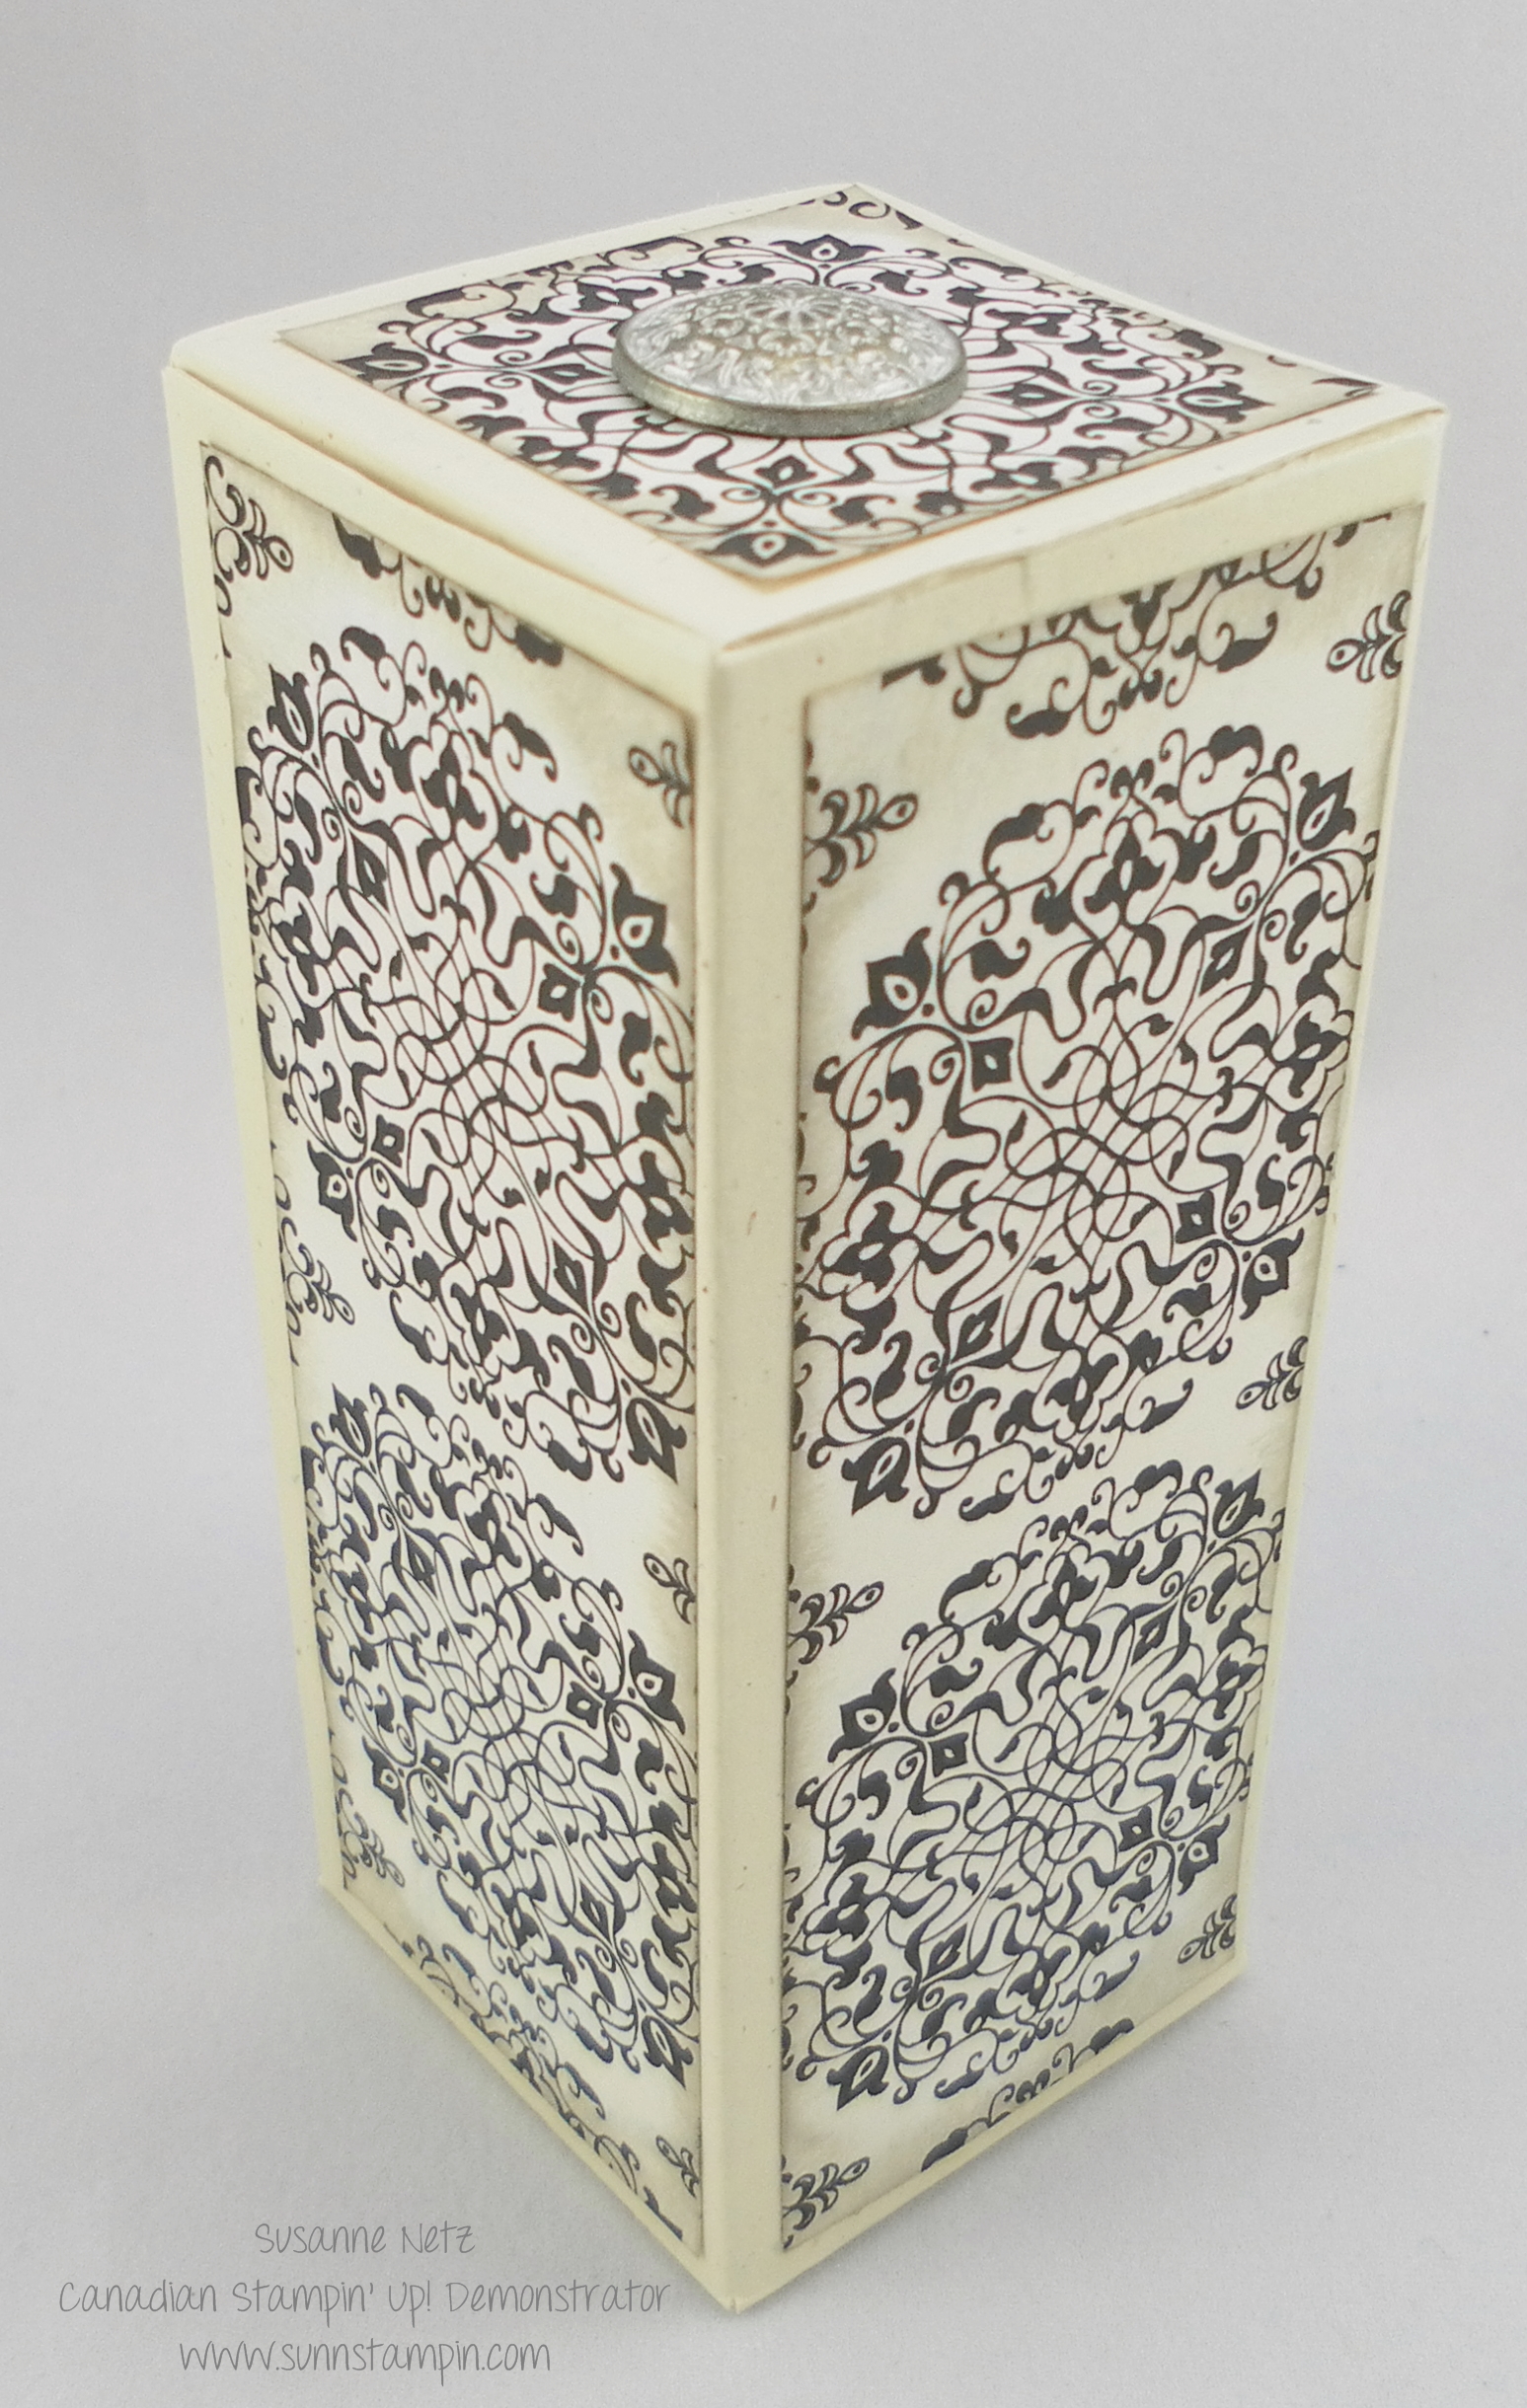
It’s video Friday and I am going to demonstrate how to make a very simple box that can hold a wonderful treasure. This project was inspired by a little box that came from Italy and it has a 80 year old balsamic vinegar in it, hence the name “vinegar box”. I love the size and as I said in the video I have made 8 to give out to the attendees of my very first workshop. I am sure they will all be excited to see how it was made. A note here that the venetian romance designer series paper that I used to decorate the box will not be available for purchase after June 2, when the new catalog is relased. However, I have the catalog in my hand and there are some really beautiful new papers for sale. Gotta love Stampin’ Up! Out with the old gorgeous paper and in with the even more gorgeous paper. I can’t wait to show you…want a catalog? Email me at sunnstampin@gmail.com and we will work out the details!
Enjoy the show.
To make this Project:
Supplies:
1 8 ¼ by 8 ¼ inch cardstock
4 pieces of dsp measuring 3 by 1 ¾ inches
1 piece of dsp measuring 1 ¾ by 1 3/4
Scoring:
Score at ½ , 2 ½, 5 ¾ and 7 ¾ inch marks
Turn around and score at 2, 4, 6, 8 inch marks
Tools I Used:
Scoring Tool
Sticky Strip
Thank you for watching, see you next week with a new stamp set, 4 cards and another paper crafting adventure video.


![Perfect Pennants [english, clear]](https://i0.wp.com/www.stampinup.com/images/EC/133230s.jpg "Perfect Pennants [english, clear]")